Jump to content
  • Articles

    Our website articles

    Quality benchmarks. Tie-offs

    By Irina, in Machine embroidery materials and technology, , 0 comments, 4,216 views
    Original text by Marina Belova 
    Tie-offs are a secondary property of the object. But they are important nonetheless. 
    Tie-offs are made of several short stitches (usually 1—1.5 mm, and never over 2 mm) that prevent the embroidery from loosing up. 
    Reasons for inserting a tie-off: 
    In the beginning of the embroidery  In the end of the embroidery  Before trimming  Before/after a jump  Before/after thread color change  It is better not to use tie-off without a reason, for they may lead to "bird nesting" on the wrong side of the embroidery. 
    Ways of inserting a tie-off: 
    Manually  Automatically  Manually inserted tie-offs 
    Only a small number of digitizers insert their tie-offs by hand. Usually, they are pretty much satisfied with what the software could offer. 
    Manual tie-offs are used often in cases when an automatic tie-off at the end of the object becomes too apparent to the eye or distorts the outline. Small letters with narrow outlines, for example. In this case a tie-off is digitized manually in such a way that it becomes lost between stitches. 
    Types of automatically inserted tie-offs 
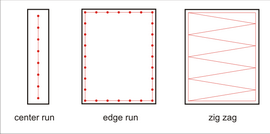
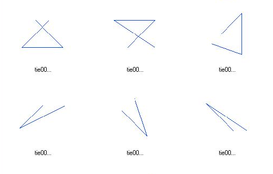
    There are different types of automatically inserted tie-offs. A line and a butterfly are considered the most common. There are several ways of inserting them. 

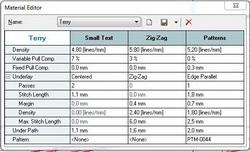
    Often the embroidery software offers a whole row of options, out of which you can choose the one you need. For example, in the Stitch Era Universal you can choose a tie-off out of 5 suggested ones: 

    In Tajima DGML by Pulse 12 there are only 2 types of tie-offs. And Compucon has 12! 

    Additionally, some embroidery editors it is possible to modify the chosen variant. Usually, you can change the stitch length and the number of stitches. 

    How to choose the right kind of thread for machine embroidery

    By Irina, in Machine embroidery materials and technology, , 0 comments, 3,399 views
    Original text by Marina Belova 
    You can have anything regarding threads now: there is a huge variety of colors, fibers, thicknesses in machine embroidery. There are even threads that have special properties. They were created specifically to help you achieve all kinds of effects. 

    You can divide them into different groups, depending on, say, fibers: 
    Rayon (Viscose) — an artificial thread  Polyester — a synthetic polymeric ester thread  Metallic thread  Threads with metallic polyester coating. Usually, they have a polyester or nylon thread inside.  Twisted thick threads  Flat tin threads  Cotton threads  Threads with special characteristics or outer look:  Twist — a thread that is made of 2 or more colored fibers, twisted together.  Acrylic (woolen) thread — a thick spun polyester thread  Threads that glow in the dark  Threads that change their color under in the sunlight Non-flammable threads  Multicolored threads — the ones that are of several colors simultaneously.  Below I'll list the properties of the most popular kinds of threads. 
    Rayon thread properties: 
    Soft  Shiny surface  A great variety of shades and colors (multicolored threads included)  No loops during the embroidery  Easier to handle that polyester  A great thickness range: from 12 to 60  More sparing of the equipment, than polyester threads  Washable  May be dry-cleaned as well  Polyester thread properties: 
    An ordinary polyester thread has a brighter luster than a rayon one. But there is also a lusterless polyester called Frosted Matt from Madeira.  More durable than rayon thread  Can be whitewashed or subjected to other chemicals  More elastic than a rayon thread. Therefore loops during the embroidery are possible.  Polyester thread is cheaper than rayon  Polyester distorts the embroidery more than rayon  Metallic thread properties: 
    Shiny surface  Can have a textured surface  Less flexible than polyester or rayon  Not suitable for all kinds of fabrics  May twist when coming off the spool  Great thickness range: from 15 to 50  Cannot be whitewashed  Cotton thread properties: 
    Lusterless surface  Small color range  Washable  Cannot be whitewashed  Great thickness range: from 30 to 120  Clutters the shuttle because it's not as glossy as a synthetic or a man-made thread.  Beside their structure, all kinds of threads have their own weight. #40 thread is considered standard. The greater the number is, the thinner will be the thread and vice versa. You can read more about it in my article on the embroidery threads labels. 
    This is important: the threads of the same number but made of different fibers may have a different look. For example, a #40 polyester thread looks thinner than a rayon one of the same number. Cotton threads look even thicker than #40 rayon. Also, the thread thickness and weight may vary depending on the manufacturer, though they will be marked the in the same way. One needs to remember that thread thickness and type influence such stitch object property as density. You can see the general recommendations on working with the threads in the table in my article called Quality benchmarks. Understanding density. Also, you can find the table on the fabric/needle/thread ratio in my article on machine embroidery needles (coming soon). 
    Not so long ago I read in my embroidery machine user guide that it's best to use a left twist thread in machine embroidery. Here is a way of finding out the direction in which your thread is twisted: 
    1. Take your thread with both hands 
    2. Twist the thread with your right hand toward you; your left hand should remain unmoved. 
    3. See what happens with the thread. If it slackens, it is a right twist (or S-twist) thread. If it becomes tight, it is a left twist (or Z-twist) thread. 
    I've never checked the thread twist. Moreover, I've never even thought that the direction of the twist was important, too. But if even a Chinese manufacturer mentions it in the user guide, then, perhaps, I should. 
    Choosing the thread type is up to the embroiderer. Every embroiderer should try all types of thread and decide which ones work better for them. But, in any case, you should buy the high-quality threads. Because the cheap threads break often. This ruins the outer look of the embroidery and stretches production time (up to +50% of the time, according to my experience). 
    Embroidery threads storage
    It is better to store the threads in a cool and dark place with 40-60% humidity and about 20°C. Read what else you need for the threads storage here. 
    P.S. Speaking from my experience, I will assert that there are practically no interchangeable threads nowadays. You cannot replace a standard #40 rayon thread with a polyester thread of the same number and vice versa without changing the design settings, even if they are of the same brand. These threads lie on the fabric in different ways, and the embroidery looks different. Therefore, they need to be approached individually when digitizing a design, especially if the embroidery is rich in contrast. 
    Some people think that the embroidery threads should be oiled. I'll supply an article on the subject in the nearest future. 

    Quality benchmarks. Understitching: how to use it?

    By Irina, in Machine embroidery materials and technology, , 0 comments, 5,670 views
    Original text by Marina Belova 
    What is understitching (or, as it's also called, underlay or strengthening layer)? This is the most important element of the design — the embroidery basis, its "skeleton". Being embroidered first, before the outer layer of stitches, understitching creates the foundation. In order to make this basis for the future embroidery strong enough and the end result a good-quality one, you need to choose the right type of underlay. 
    Two main goals of understitching are: 
    To stabilize the fabric by attaching it to the stabilizer  To give a support and make a platform for the outer layer of decorative stitches  Additional advantages of using an underlay: 
    It helps to reduce the stitch count  Prevents the upper layer of stitches from sinking into the fabric, trample ribbing and pile  Participates in reducing the push and pull deformation  There are 3 types of stitches that can be used to form the underlay: 
    Running stitch  Zig-zag stitch  Fill (Tatami)  These types of stitches combine to make the 6 possible types of underlay. They can be created manually or applied automatically in the embroidery software. 
    The main types of underlay 

    Center Run (Perpendicular, Center Walk). This is a simple running stitch that goes right in the middle of a satin column that is usually no more than 2 mm wide. You can combine it with the Edge Run when a satin column is wider than 2 mm, and it is necessary to lift the upper layer of stitches up a bit.  Edge Run (Contour, Edge walk). This type of underlay consists of a running stitch tracing the object outline. It is essential for creating a neat even border of the embroidery (its profile). Edge Run is the most frequently used type of underlay.  Zig-Zag (Parallel). This type of understitching is made by a zig-zag stitch that goes through the entire object once. It is mostly used for lifting the stitches over the fabric and trampling pile or ribbing. It is recommended for the objects no less than 2,5 mm wide.  Double Zig-Zag. This type of underlay is also made by zig-zag stitch. But in runs through the entire object twice.  Tatami (Lattice, Mesh). This type of understitching is based on the standard fill. But is has a very limited density. Usually, the stitches here go at an angle of 45 or 90° in relation to the upper stitch layer. It is used for stabilizing big size embroidery areas in order to reduce the pull.  Double Tatami (Full Lattice). This type of underlay is likewise based on the standard fill, but it makes a full lattice — the stitches are placed at an angle of 90° in relation to each other. It is used to stabilize big size embroidery areas on highly stretchy fabrics in order to reduce the pull. Often used in highly contrasting embroidery. 
    All main types of understitching can be combined with each other if the embroidery design requires. Usually, the embroidery software either offers the choice of underlay types and their combinations or allows the users to set the values manually. 
    Tajima DGML by Pulse, for example, allows to combine up to 4 types of underlay at the same time, and it also has lots of options for every one of them. 

    The underlay stitch length depends on the kinds of fabric used. For example, the ordinary stitch length value is 2.5 mm. For slippery fabrics like satin, you can set it less than 1.5 mm. 
    When is the understitching not necessary? 
    You don't need an underlay for non-woven materials: leather, vinyl or paper. Also, when embroidering the designs like redwork or quilt the understitching is not needed. 
    This is important! Understitching doesn't replace the stabilizer. In order to achieve a good result, the understitching and stabilizers should work together. 
    One point is worth noting: An underlay created by hand often adds a much less amount of stitches to the design because of the well-planned sequence. But it requires spending more on digitizing and also experience. Automatic underlays are highly adjustable and scalable compared to the manually created ones. 

    Quality benchmarks. Understanding density 

    By Irina, in Machine embroidery materials and technology, , 0 comments, 6,266 views
    Original text by Marina Belova 
    Oh, this horrifying aspect of machine embroidery — Density! How many mysteries, conjectures, and speculations exist around it. When I first encountered it, I wondered: What density value is enough? Will 0.55 mm be too much or too little? On what one or another density value depends? 
    What is stitch density? The last question is asked by many machine embroidery beginners. Density (sometimes also called spacing) is the distance between 2 neighboring rows of stitches. 

    Only 2 kinds of stitch objects have this property: satins and fills (see the table in my article called Quality benchmarks. Stitch object properties). 
    In different machine embroidery editors, the density units may vary. The most common way of measuring density I've seen was in mm. 0.4 mm, for example. The other way of estimating density is to count the number of stitches per 1 mm or 1 inch (SPI) or to count the number of needle penetrations (points, units) per 1/10 mm. 
    Some embroidery editors allow you to choose the density measurement units out of a list. For example, Tajima DGML by Pulse has 3 density measurement units: mm, SPI and point per mm. Every user can adjust it in the software as he/she pleases. 
    One should be fully aware that changing density measurement units will have an impact on many things: 
    density


    density value in the software


    distance between the stitches


    number of stitches


    time spent on the embroidery


    productivity


    The most common question is this: what density value is considered optimal? To which all embroiderers answer in different ways. But the answer that is closest to the truth is this: "It depends…"
    A lot of factors have an impact on the choice of density value: 
    1. The type of a material to be embroidered, which defines its characteristics. 
    thickness  texture  density  numerous other characteristics  2. color of the fabric 
    3. the future embroidery design 
    4. threads 
    their thickness  type  color  5. tension regulation on the embroidery machine 
    6. what kinds of stitches will be used in the embroidery 
    stitch type  stitch length  7. kinds of stitches in the underlay 
    number of stitches their type  8. Embroidery effects that are to be achieved 
    dense filling  light filling  color-blending  9. personal tastes 
    What are the reference points for choosing density values? 
    The most important thing is to get a good coverage. 
    For example, logo and chevrons require a density value that covers the fabric completely. That is, it should not show between the stitches. 
    The most common recommendation on densities are as follows: 
    don't change the density value when substituting a #40 polyester thread for #40 rayon. In my opinion, this can be disputed.  lower density when substituting #40 threads with the ones of bigger number (#30 rayon or polyester with acrylic threads or the threads that glow in the dark).  darker threads require lower density values for covering the light-colored fabrics than light-colored threads for the dark fabrics. More about it here.  long stitches give better coverage than short ones  metallic and other threads of special kinds work better with reduced density and longer stitches  satin stitches require varying density in accordance with the stitch length Read more about it in this article.  if the design is distorted after the embroidery, you can try to lower the density value by 10%. Try again and see the result. Keep trying until you get a result that satisfies you.  You can learn the recommended density values from various kinds of brochures issued by the thread manufacturers. 
    Madeira, for example, suggests several tips for digitizers on how to find the right density value and needle thickness, so that they have a starting point in creating the embroidery design: 

    The consequences of the excessive density in a design are usually the following: 
    design distortion  coarse embroidery  thread breakage  perforation on edges  higher cost: production consumes more of your time and resources  In one word, there are no ready answers when it comes to density — everything should be tested. Read here about an interesting method of finding the right density value for various kinds of threads. 

    Choosing fabric for machine embroidery. Knits

    By Irina, in Machine embroidery materials and technology, , 0 comments, 2,605 views
    Original text by Marina Belova 
    Knitwear (french: tricotage) is among the most frequently used fabrics for machine embroidery. 
    Knits are textiles made by knitting yarns or threads. When comparing woven and knitted fabrics, you can see that the intertwinement of the threads in a knitted fabric is distinct from that of the woven material. As this is what determines the whole process of design creation and embroidery the follows, they will be very different for knits. 
    Knitted fabric consists of loops that intertwine both lengthwise and crosswise. It is usually more stretchy along the rows of loops than across, but there are knitwear varieties that stretch in both directions. Type of interlocking is defined by the shape, position, and size of the loops, and also by the connection between them. No fabric can rival knitwear in stretchiness and shape retention. Though, there is a kind of knit fabric that stretches little, like a woven fabric. 
    Knit structure depends on the fiber type, yarn thickness and structure, type of knit, loop length, knit density, and finishing. 
    There are 3 main groups of knit: 
    Plain knit — the simplest weave that is made by identical loops. They are very stretchy.  Plain knits differ from each other by the way of forming the fabric that defines the knitwear properties. 
    Derivative knits structure contains several identical basic knits interlocked.  Fancy knits that are based on plain and derivative knits by changing their structure in order to achieve textured, open-knit or colored patterns.  Knits: main properties 
    1. Geometrical 
    Density  Loop length  Thickness — determines the volume. Knitwear thickness is between 0.4 to 5 mm. It is influenced by the thickness of the thread that comprises it, their interweaving and density.  Mass (weight per 1 m2) depends on the loop length, density and thread thickness. Mass range is quite wide — from 30 to 600 g/m2.  2. Mechanical 
    Breaking resistance — the degree of tensile strength  Stretchiness — the ability of the loops to change their shape under the influence of outer forces.  Depending on stretchiness, all knitwear fabrics are divided into 3 groups: 
    the ones that can stretch breadthwise up to 40%  between 40 and 100%  over 100%  Resilience — the ability of the fabric to return to the original shape after being distorted. This is very important when hooping.  Proneness to unraveling — how easily will the fabric unravel if one of the loops is damaged.  Creasing property — the ability of the fabric to crease when folded.  Needle penetration resistance is of extreme importance during the embroidery. The needle separates the yarns in the loops and runs through the fibers. If the knitted fabric is dense and slow-moving, and the needle is thick or sharp, it may damage the fibers that lie in its way. As a result, the loops will slip.  shrinkage while washing and pressing  wear resistance  3. Physical properties
    moisture retaining property thermal conductivity If you look into the catalogs issued by the clothing manufacturers, with the clothes intended for transferring pictures or patterns onto them, you can see that there is a huge variety of knits. They all differ in structure, quality, density. There hardly is a universal way of embroidering on all of them. 
    Before starting the embroidery on knitwear the most crucial thing is to find out which kind you're dealing with, to identify its structure and in what direction it stretches. This will help to choose a proper stabilizer, hoop the garment and create or find a suitable design to embroider on it. 

    Choosing fabric for machine embroidery. Woven fabrics

    By Irina, in Machine embroidery materials and technology, , 1 comment, 3,504 views
    Original text by Marina Belova 
    We all use fabric or some other material as a base for our machine embroidery. Machine embroidery is possible on a huge variety woven and non-woven fabrics and also knitwear. The machine embroidery design construction in many ways depends on the properties of the fabric that is going to be used as a base. 
    Today I decided to delve into the properties of the woven materials. I'd singled out 3 groups of properties that have the great influence over the embroidery: 
    Main properties of the woven materials concerning with structure: 
    Density which is determined by the number of the warp and weft yarns in 10 cm of the fabric. There are tightly woven, loosely woven and open fabrics. 
    The interweaving of the yarns has an impact on the durability of the fabric, its texture, elasticity, thickness, coarseness, proneness to fraying and shrinkage. 
    Main (simple) types of weave 
    Plain weave. Front and back side look identical. The fabric is highly durable.  Twill. Diagonal lines are distinctly visible on the fabric, running out from below left to upper right or upper left to below right. The first one is more common. Though such fabrics have a smoother surface, they are less durable than plain weave fabrics. They are distinctive for their softness and elasticity, their ability to arrange in folds and their stretchiness, especially diagonally.  Satin — has a smoother and evener surface than twill, is shinier, softer and more elastic and also ravel-prone.  Huck-a-back  Ribbed — has longitudinal or crosscutting ribs on the fabric.  Basket weave — has square-shaped ribs of the fabric.  Three-dimensional weave — a picture where warp or weft threads is raised.  Complex weave — made by 3 and more threads.  Jacquard is made by 3 and more threads.  Geometrical properties 
    Thickness — distance between the protruding parts of yarns on the right and wrong sides. Depends on the thread thickness, their curvature, type of weave, density and finishing. Plain weave fabrics are the thickest, twill and huck-a-back a bit thicker and complex weave cloths are the thickest. The choice and expenditure of threads, also the choice of needles and stabilizers depends on the fabric thickness.  Surface density is weight per 1 m2 of the fabric.  Mechanical properties show how the fabric reacts to the forces imposed upon it. 
    Tensile deformation  Flexural deformation  Technical properties, which characterize various stages of embroidery production. 
    Proneness to slip — depends on the surface: on the yarns and weave.  Cutting resistance.  Fraying ability — the ability of threads to slip and drop out of raw edges. Depends on the types of threads, their weave, density, and finishing.  Shrinkage — ability of the cloth to decrease in size under the influence of heating and water.  The ability of extrusion while washing and pressing — the ability of the fabrics to take a shape and retain it in wear. Depends on the fiber composition and fabric structure.  Yarn slippage — shifting of the yarns against each other under the influence of outer forces, which damage the structure and look of the fabric. Low-density fabrics are marked by it. These are silk cloth, organza and so on.  Proneness to needle cutting is what causes the damage to the fibers by a needle. It depends on fabric structure and type of finish, density, the right choice of needles and threads. Plain weave is easier for the needle to cut through, therefore, these fabrics are damaged more often than the ones with twill or satin weave.  Compressibility — the ability of the fabric to become thinner when being compressed. It characterizes thread expenditure and seam structure. Thick loosely spun fabrics like drape cloth and baize are compressible, the seams lie deep and are not visible. Coarse fabrics are almost non-compressible, the seams protrude from the surface, are visible to the eye, and these fabrics require more threads. 
    All these particularities of woven cloth make their mark on the digitizing process — every one of them has its own underlay properties, push and pull compensation, density values and so on. Therefore, there are no settings that are good for all types of fabric simultaneously, and you need to make alterations every time. Besides, the properties of the fabric influence the embroidery process: the (im)possibility of hooping, the hooping method, the choice of stabilizers, etc. 


    Choosing fabric for machine embroidery

    By Irina, in Machine embroidery materials and technology, , 1 comment, 4,669 views
    Original text by Marina Belova 
    The most interesting aspect of machine embroidery is that one design can look different after being embroidered on different fabrics. And the reason for this are different fabric properties, which have a great influence over the end result. Digitizing and the embroidery process are essential, too. 
    All fabric for machine embroidery may be divided into 3 groups; I'll cover their properties in separate articles: 
    Woven fabrics  Knitted fabrics (various kinds of knitwear)  Non-woven materials (leather, felt, paper, wood, etc.)  Each of these groups can be split into subgroups and types. It is generally accepted that woven fabrics are much easier to embroider than knits. In my opinion, it is nothing more than an embroidery myth. Benchmark parameters for all kinds of fabrics have existed for a long time, as well as for the needles and stabilizers and other stuff. When working with this or that kind of fabric they should be used as a starting point. And if you have some experience and power of observation, you can conquer them all. 
    You don't even need to go far to obtain this information — nearly any machine embroidery editor has templates with preset values of density, compensation, types of underlay and so on. For example, this is the template for embroidery on terry cloth in Stitch Era: 

    Sometimes the embroidery software will even offer you recommendations on the choice of stabilizer like I was in Drawings. 
    But I'll repeat just once more: take no instructions for granted but go and try for yourself instead. 

    Thick #12 cotton threads

    By Irina, in Machine embroidery materials and technology, , 1 comment, 6,561 views
    Original text by Marina Belova 
    I've had very thick cotton embroidery threads (Gunold Cotty 12) for some time, but I still don't understand where they can be used, and what can be embroidered with them. For they appear rather crude to the eye. Perhaps, some of you have used them before and will be so kind to share their experience? Share your thoughts, please! 

    The purpose of these threads, as I see it, is to get a result that looks very much like it was embroidered by hand. But how to do that? Even the manufacturer's brochures don't shed much light on that question but give only the most general recommendations on how to work with these threads and what is their purpose. 
    The recommendations are as follows: 
    #90/14 SES or, in case you have a more dense and heavy fabric, #100/14 SES needle. It's better to use a special needle — like the one for metallic threads — instead of a standard one because it has the bigger eye (DBx7ST by Sсhmetz).  The bobbin thread is a standard one.  Not much for a start. 
    The color chart is not so big — just 52 colors; apparently, it's due to the difficulties with the coloring of the natural fibers. But, in any case, it's not so little. 
    I can add what is on the tip of my tongue when I'm looking on this thread: 
    Its higher fluffiness will require the more frequent cleaning of the machine.  I'll need to play with the tension regulator to increase the tension.  Reduce the machine embroidery speed  Don't forget to choose the appropriate stabilizer  Chances are that the design digitizing will be rather like the one with acrylic (woolen) threads, and the general recommendations are as follows:  Redwork designs are splendid.  You can try motifs which have longer stitches.  Basic density value is 0.8—1 mm.  Remove all stitches shorter than 1.5—2 mm.  Increase the stitch length to 3—8 mm at least.  No or minimal understitching. The density of the underlay is low, the stitches are long.  No designs with lots of layers.  You can upscale an existing design, digitized with an ordinary #40 thread, for 20% without a stitch recount.  Well, I need to work with what scarce information I have and experiment. 
    This is what I got after embroidering the first sample of the design: 

    Tension regulation proved to be quite a task: I needed to screw the handles until they were tight. Despite that measure, the thread continued to loop. It is most likely that this happened because of a standard needle which I use for #110 acrylic threads. This is how the wrong side of the embroidery looks like: 

    And these are the conclusions I arrived at: it's better not to use these threads in a double or a triple run — it will look too crude. One run is enough, for the thread is rather thick. And if you still want to make the stitch thicker, bean stitch or backstitch is the best solution. 
    Optimal satin stitch lengths are 3—7 mm. Shorter stitches (1.5—3 mm) are good, too, but they are a bit too short. I liked the stitch density set at 0.8—0.85: it gives a good coverage and there is no slacking. I used very little understitching, except edge run in the fills. 
    Automatic tie-offs work good, thought I manually increased the stitch length in them. The trimmer cut this thread every other time, and, judging from the sound it made, not without difficulty. Therefore, one should reduce the number of trims in the design or leave the jump stitches. 
    After the first sample, I tried to embroider the flower with satin and running stitches only. This is what I got: 

    As you can see in the photo, the long (over 8 mm) stitches begin to slacken and the background shows through. From all appearances, I'll have to give up the fixed density value and choose density according to the stitch length. For this sample, I decided to change my needle for a #90 one, which helped me to get rid of the loops. The stitch count here is only 2000, which is a very small number for a 110x110 mm design. 
    Having embroidered the flower, I remembered that I had the home-produced pure silk threads stashed somewhere: 

    I checked the direction of their twist, and they turned out to be left twist threads. I compared them to the cotton threads regarding their thickness.
    They turned out to be very much alike, though the silk ones were slightly thinner. Or, they seemed to be thinner because of the lack of the fluff, 
    so I decided to embroider the same flower with them, in case it would turn out good. Then I could use this kind of thread for various projects. 

    But they were a disappointment. Despite the enhanced strength, promised by the manufacturer, the thread kept breaking, especially on the stitches shorter than 3 mm (the cotton thread didn't break at all). Also, silk proved to be very tricky when it came to tension regulation. If I adjusted the tension according to the particular stitch length, the thread would loop on longer stitches, and the bobbin thread would show on the right side on shorter stitches. So, I agonized over it for a while and let it all hang out — perhaps, I'm not yet ready for these threads. This is my best attempt so far: 

    Such are these enigmatic thick threads. It seems likely that this kind of threads is only good for decoration of the details.

    Machine embroidery on paper

    By Irina, in Machine embroidery materials and technology, , 1 comment, 5,206 views
    Original text by Marina Belova 
    Machine embroidery on paper is rapidly becoming more and more popular these days. This may be various postcards, gift-wrappings, labels, bookmarks, sachet, pictures and so on. Anything really. Any scrapbook can be your source of inspiration. 
    A year ago I became excited by the idea of embroidering on paper and decided to give it a try. This is my embroidered postcard: 

    I didn't find embroidery on paper all that supernatural. All you need to do is to follow several simple rules. It must be said, that the embroidery on any other kind of material has its own rules that should be followed. 
    The main rules of embroidery on paper are: 
    1. Get the paper of a particular kind. I've read many articles written by professionals in the field, and they recommend to use hand-made paper. Such paper is made of long fibers and is thus similar to a cut-away stabilizer in structure. The properties of such paper, such as density, texture, color, structure, etc, may vary. You can buy it at any place that offers scrapbooking essentials. 
    Nevertheless, in my opinion, you do indeed need the paper composed of long fibers as a basis for your embroidery, but use almost any kinds of paper for small details. 
    2. Any threads are good. 
    3. The only limiting factor will be thickness because the needles thicker than 75/11 will make too big holes. 
    4. Because paper cannot be hooped (or permanent crease marks will appear), you'll need a stabilizer (of a cut-away, tear-away or water-soluble variety), onto which your paper will be stuck. 
    You can use an ordinary temporary spray adhesive or even a simple glue pencil like I do. You can also use various adhesive tape if you like. The choice depends on the situation. 
    5. The designs for embroidery on paper should be very simple. They should be carefully chosen or created specifically for that reason. 
    Such can be designs of a very low density or containing just outlines (made with running stitches). If satin stitches and fills are present, use a dense cut-away stabilizer. 
    Stitch length should be no less than 2 mm. 
    In other words, you can use running stitches, motif stitches, appliques, low-density fills without an underlay, low-density zig-zag stitches and satins. 
    6. When embroidering an applique, it's better to use templates. 
    This is all, in a nutshell. 
    The rest is for trying and experimenting. 

    Machine embroidery on felt

    By Irina, in Machine embroidery materials and technology, , 1 comment, 10,159 views
    I think that felt is one of the most common fabrics for doing machine embroidery samples. It is also used for chevrons, appliques, and in any case, it is extremely popular nowadays. It is a non-woven material that resembles valenki by its outer look. Felt can be made of a variety of fibers, natural (wool) as well as synthetic (polyester). The thickness and color of this material also vary greatly, which is very handy.
    I first came across this material quite a long a time ago and only then noticed that the embroidery looked different from that on any other kinds of fabric — all the elements became narrower. But that was when I didn't use any stabilizer, so the such a result was hardly surprising.
    In reality, if you follow a production process and embroider on a stabilized fabric, felt is one of the easiest materials. You can embroider on it with no difficulty at all, and design creation for felt is also easy (it is used for samples for a reason).
    You can embroider almost anything on felt — big and small details alike will look good on it. Like with any other fabric, digitizing a design for felt and embroidering on it has its undemanding rules:
    For the ordinary designs, use a middle-weighttear-away stabilizer. For large objects with lots of stitches, a middle-weight cut-away will be just right. You can additionally sprinkle it with a temporary spray adhesive. You'll need #75 needles, with sharp needlepoint. But if you're going to embroider small details with thin threads, you'd better change your needle for the one matching the thread (#65). When embroidering with thick threads, you should likewise choose a thick needle. But the needlepoint stays sharp in all cases. Density values can remain standard, enough for sufficient coverage (0.4-0.45 mm). Understitching is traditional and unpretentious. Pull compensation is up to 10%. Felt is a very easy embroidery material. The only thing I don't like about it much — it's quite thick and therefore hard to hoop. But the quality of the embroidery saves it all.


  • Top Downloads

  • Recently Browsing   0 members

    • No registered users viewing this page.
×
×
  • Create New...