Search the Community
Showing results for tags 'satin'.
Found 21 results
-
 I have used Hatch software to convert some pictures to an embroidery designs, they look fine in the Hatch portal and .EMB format but when exported to .PES format the blocks of colour don;t keep their format - the stitches have large ggps in them - any ideas ? Thanks Red Dragon 4.PES Red Dragon 4.EMB
 -

Machine embroidery stitch types and limitations
diver361 posted a blog entry in Embroideres com: tips.
When your learning to digitize it is very important that you understand what the different stitch types and when they should be used. Depending on your level it will depend on what tools you have. Embroidery stitch types There are three main categories of stitches in your software these stitch types can take form in many different ways. The three stitch types includes the run style stitch, satin style stitch and the fill style stitch. Lets take a closer look at them and when to use them. Run Stitches A run stitch should be used when you need a thin line, either as a traveling stitch, underlay or decorative stitch. These do not have any push or pull on the fabric, but they can sink into some fabrics and you may need to use a bean or two ply stitch to get a desired result. Stitch length should be between .03 to .15. Satin Stitch The satin stitch is the main style of stitches for most fonts, it works best in situations where the stitch is not uniform, and works best between .03 to .35 inches thick,depending on your machine you may be able to get up to .42 inch or .51 inch but it will often be loopy. Fill Stitch The fill stitch come in many shapes and patterns but it can be used to fill any area where a satin doesn't work, great on areas .10 to infinite. However on large fills you may want to look at applique. You can use it in smaller applications but tends to distort at smaller sizes. Fills are great for blends. There are some other stitch type you will see in your software and they are all based from the three basic stitch types. Manual Tool This tool is very similar to the run tool except for a value for the stitch length you can place your stitches randomly as needed, however watch your stitch length. Steil Stitch This is very similar to a satin except its a zigzag and only one line, so the thickness is uniform. recommend for borders where its even and works best between .03 to .20 This tool is based on the run tool it repetitive pattern. Programmed Fills These unique patterns are based on the run tool, they have 1 start point 1 except point and they have to start and end in a repetitive pattern. Column Tool Is based on a Satin stitch where you draw the outline and it adds the stitches depending on the density. Enhanced Column Tool This is like the Column tool its based on the satin style of stitches but allows you to corner or bend the lines, where the column tools is for straight lines. Fill ToolThis tool was based on the run style of stitches however its now its own stitch type , there are hundreds of patterns made by changing the stitch type and creative effects, including the carved style of stitches, similar tools may include cascade fill, cross stitch fill. The rules for these tools are not set in stone, you can manipulate them to suit your needs in the advance blogs we will be covering blending, shadows, wave fills etc. These are all based on the basic tools. Machine embroidery design characteristic When a customer shows you a designs you first should be able to recognize what stitches you will need to use, you should also be able to see what is in the for ground and background. This is generically called pathing. Pathing is basically mapping the design, it allows you to hide some stitches and be able to reduce the amount of trims as the stitches are not trimming or jumping. A good digitizer is able to path a design prior to digitizing it. Any embroidery will tell that they can recognize a poorly digitized design as it causes their machine to clunk and has unnecessary trims, or too many trims which can cause simulated thread breaks, or worse. -
Version Any formats: dst, exp, p
2,740 downloads
Two hearts symbolizing love and eternal feelings will be a beautiful decoration of the sofa cushion or T-shirt. Romantic symbol made in the style of Celtic patterns. Together with the names of lovers and embroidered on a towel or napkin can be a personalized gift for your wedding day. Sizes: 5.72 x 4.09' , 7.76 x 5.52' , 9.45 x 6.72' Author: Oxana Vushkan -
Version Any formats: dst, exp, p
3,019 downloads
Embroidery to decorate the interior of the house. Beautiful big rose surrounded by leaves. Convex elements are made with satin stitches. A great project for creating stylish pillows or napkins in the living room. Professional digitization. Sizes (3 parts) : 4.94 x 8.44' , 4.93 x 8.43' , 4.24 x 5.73' -
- 2 comments
- 3 reviews
-
- 5
-

-

-
- red
- one colored
- (and 4 more)
-
Hi All. i have zsk embroidery machine and tajima pulse software.when i do satin embroidery on hat stitches come out.complex fill designs are okay,only satin stitches making problem.i am sure this is software issue because it is not happening on digitized designs.i use between 0.2 to 0.4mm density and around 10% plus compensation which increase stitch thickness. i attached some pictures about my software.Does anybody have idea? i am really stuck and i need your help guys.Thanks.

-

Cotton t-shirt with Mosaic horse embroidery design
ekatreina posted a gallery image in Things embroidered with Animals designs
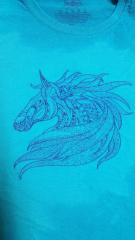 This picture is fragment of convenient and stylish knitted t-shirt. It is decorated with Mosaic horse 3 machine embroidery design. It is portrait of wild horse executed in special manner. It consists of many small details which look like elements of mosaic. Together they create entire picture which shows recognizable silhouette. This embroidery sample will definitely attracts much attention of people around.
-
- 1
-

-
- one colored
- t-shirt
- (and 11 more)
-
 Dear Embroiderers, I have broken 2 needles now and machine kept asking something about upper thread. 2 needles. What could be wrong? Is the machine not accepting the thread? I am using a cotton thread with a satin finish. I was watching the thread go through and noticed the thread is not jamming at the spool of thread but somewhere inside the machinery (above the needle)- I hope you get what i mean. will be grateful for your advise on this.
 -

Version 1.0.0
651 downloads
Shark Free Design- 1 comment
- 1 review
-
- 2
-
-
-
- one colored
- satin
- (and 7 more)
-
 Golden Shark free embroidery design View File Shark Free Design Submitter Pipi Huang Submitted 04/26/2018 Category Sea theme
 -
 Original text by Marina Belova Synthetic satin (polyester or acetate) is for some reason considered a rather tricky fabric, prone for puckering and other embroidery distortions, the one that does not tolerate any mistakes. So I decided to check if that was indeed so and why: to me, the fabric seems quite stable and not likely to present any problems. Except that it is very smooth and able to slip out of the hoop; there also can be hoop marks, like on silk or organza. But first, let's see some general recommendations on working with this fabric: When choosing the image or digitizing the design you should not forget to lower the density (0.45–0.5 mm would be OK). Understitching should be kept to a minimum. Although, in you ask my opinion, sparing the underlay seems strange for such a slippery fabric. Satin and filling stitches should not be over 3–4 mm in length. It is important to stick to the embroidery sequence (from the center onward). In order to avoid gaps, filled objects should be embroidered in one direction and not in multiple crossing ones. Read more about it in my article about digitizing complex shapes. The fabric should be hooped together with the stabilizer, trying to keep their contact to a minimum; also, don't forget to wrap the hoop in the fabric or paper prior to that. The stabilizer should be of a tear-away middleweight variety. Or, you can use an adhesive stabilizer like Filmoplast + an additional tear-away stabilizer under the hoop to avoid hooping the satin. Any kind of threads can be used, but everyone seems to prefer rayon. Needles should correspond in thickness to the thread and the fabric. SES light and round needlepoint is preferable. I created a flower design and embroidered it on the satin. The result, in my eyes, is very good: That is, despite the rather dense fill, all puckering and distortion were easily removed with an iron. There was no hoop burn whatsoever on any of these satin pieces. A slightly visible ring on the fabric was easily ironed out in both cases: I probably didn't problems with this because I usually wrap the smaller ring of the hoop in order to prevent the fabric from slipping. About this and other little things that make hooping more easy and efficient, read my article called "Hooping minutiae". The only embroidery defect I saw was shifting of the fibers along the perimeter (which is not a rare occurrence). The embroidery being dense, this defect is visible, but it doesn't bother me: I also want to point out that the design of a lower stitch density, embroidered on the same fabric, puckered as well. But, again, it is not a big problem and can be removed by washing and ironing: I think, this fabric is nothing to be afraid of. I used the ordinary threads and #70-75 needles with SES needlepoint present on my machine. And one layer of 40 g tear-away stabilizer. But I added temporary spray adhesive because I thought that my fabric, a very fluid one, needed it. I didn't use any additional fabric or paper between the rings, and the front side of the satin touched the hoop. I digitized the design as usual, except lowering the density in the fills. The resulting density was 15–20% lower than the default one in my embroidery editor. And it is usually set at 5 lines per mm (~ 0.4 mm). To prevent the fabric showing through the stitches, I added density to the underlay. The bottom line is, the more I embroider on different fabrics, the more intuitive I get considering both the digitizing and embroidery processes.
 -
 View File Two hearts free embroidery design Two hearts symbolizing love and eternal feelings will be a beautiful decoration of the sofa cushion or T-shirt. Romantic symbol made in the style of Celtic patterns. Together with the names of lovers and embroidered on a towel or napkin can be a personalized gift for your wedding day. Sizes: 5.72 x 4.09' , 7.76 x 5.52' , 9.45 x 6.72' Author: Oxana Vushkan Submitter Carol1950 Submitted 02/13/2015 Category Valentine's Day
 -
 View File Yellow rose big decoration free embroidery designs Embroidery to decorate the interior of the house. Beautiful big rose surrounded by leaves. Convex elements are made with satin stitches. A great project for creating stylish pillows or napkins in the living room. Professional digitization. Sizes (3 parts) : 4.94 x 8.44' , 4.93 x 8.43' , 4.24 x 5.73' Submitter ramages Submitted 01/20/2015 Category Flowers
 -
View File Zip free embroidery design Size: 1.62 x 4.67' Submitter violet Submitted 02/09/2015 Category Decoration free embroidery designs
-
Hi, I wrote recently asking about this. I downloaded the KIA logo embroidery design that you have on your site. Many of your other logos come in a size for a left chest image, but this one doesn't. I was wondering if you could make one. I used my software to resize the image, but it's a tatami stitch and at a small size, it needs to be satin. I can't seem to change it. Can you help? Will it cost anything? I think it needs to be about 1" x 2". I appreciate your help! Thanks,
-
I am trying to enlarge Abbey font up to 4"- well beyond its recommended maximum. I have managed to get the letters fill adequately by changing the fill from Satin to Smooth; however the edges are a little ragged. Any suggestions? Can I add a narrow zigzag?
-
Hello, I am new at this Version 11.21 Seirra Embroidery office. I can not get my Lettering to sew out in Fill embroidery stitches. I go to Lettering, choose my font, size and type (arch, straight etc) but when I try toselect it for fill with undrlay it does not work. Please can anyone help me. Please forgive my stupidity but I am just learning this new 11.21 verson. Also, How can I get Hat text/designs to sew from cenetr out? Where do you select this at and get it to work. Having a difficult time with this new version.Thanks Allen
-
 hi there, is there a standard density satin stitched lettering should have when going over the top of a complex fill stitch? when i do say 5-6mm lettering on top of a complex fill, i usually have the density at -.5 to -.6, with the pull comp at approx .12 to .15 - it normally comes out looking great, except where the stain stitch letters have the same angle as the complex fill, causing the lettering to fall away and get lost in the complex fill.making these letters look thinner than the rest. and should there be an underlay on small text when going onto of a complex fill stitch?? i normally use a single line underlay stitch at approx length of 1. to 1.5. can anyone out there help, this is lettering our digitizing and quality down your help would be greatly appreciated thanks
 -
I have just upgraded to the latest version of 14.1.6.5388 and its set for default density of 63.5 however under properties in satin it shows 0.0 spi I have no idea why I have composer
-
Embroidery on caps
diver361 posted a blog entry in Embroidery Designs that Wow: Adding Personality and Charm to Your Home
How to program designs of machine embroidery for caps the information is everywhere. But here for some reason each time when I see new machine embroidery design which needs to be attached on frontal part of a cap, I start panicking and thinking: what from all of known rules will work in this case? And each time as in the first class though from the theoretical point of view, it seems, everything is clear and clear. So, I will pass to scoring of theoretical bases of creation of design of embroidery on caps. • It is desirable to do design not difficult, large. Excess details without which it is possible "to live", better to clean. • The proportions of design usually is in limits 2,25 inches (55мм) height and 4,5 inches (112,5мм) width. To be sure what exactly from design is embroidered in such small size there is a standard recommendation – to print out design on the scale of 1:1 and to put to an embroidery place. Then at once it becomes obvious that what will be embroidered and what not. • Density of an embroidery can be slightly increased in comparison with usual for such fabrics (for example, to use 0,3-0,35mm for twill). But as it seems to me, value of density nevertheless – is the matter of taste of each designer of embroidery. • To clean frame lines far away from object edge (it is more than on 0,7мм). • The minimum size of test – the 6-7th. • To avoid difficult outlines (double satin, satin + a simple line, etc.). • To avoid long runs between elements. • As the embroidery on forward part of a cap goes not on the planes, but on the rounded surface, in the course of an embroidery a high probability of deformation is in outlines, and as result of it, not combination of outlines in places of a joint is more probable or their missing in the necessary place on design is simple. That to avoid it, it is necessary to observe simple rules of collecting sequence of embroidery: о Large or central objects are embroidered first of all. o Then added additional changes of color. For example, if the letter is with an outline, it’s better to do an outline at once after an embroidery of the letter. o The Embroidery has to be planned from the center in different directions and from a peak to the top part of a cap. In drawing below is the classical example when on frontal part the word is written. In this case the sequence of embroidery will be such: at first the letters "FOR" from the central seam aside, then "MAT": • It’s necessary in case if it is possible to avoid hits of letters on a seam, shifting an inscription aside. • If after all it’s necessary to embroider on a seam, we can try to smooth it. For this purpose usually advise to arrive as follows: to block a seam across specially digitized zigzag. Color of threads for this purpose usually select in tone of fabric of a cap: • To smooth a cap surface before the main embroidery, it is possible to use the following trick - to put here such special framework in shape a leaf streak in tone of fabric of a cap (one of kinds of beam frameworks): • It should be taken into account always application option which needs to be sewn only on perimeter on a cap. Here, it seems, everything is clear. And all the same, each time as the first when you deal with caps – it is necessary to include the head (mind). Well and certainly to consult on people more skilled and competent, than I. -
On what it is necessary to pay attention: at change a contour form from a wide place to narrow, stitches start approaching with each other and can form filling of very big density. Part of editors of an embroidery the software solve this problem. In bottlenecks there is a shortening of lines and not all lines get a narrow neck and density remains to a constant without unnecessary consolidations. Some the editor allow to lay out lines in the elementary a pattern, instead of it is simple to set chaotic punctures. Creation of the additional line of a puncture (carved line, emboss line) – the user can set any line through which will pass additional punctures. Change of a form of corners (cap, mitered, etc.). Some machine embroidery digitizing software determine a corner form automatically by the of algorithm and give the chance to the user to affect this choice. In more detail about corner formation I plan to write a post later. Satin of constant width (Steil, Serial satin, Satin border) It is constructed on the basis of the simple line. Allows to apply to itself also the mass of any interesting effects. Such satin easily becomes and very simply – one line is drawn and the satin width (1, 2, 3мм, etc., how many it is necessary) is set. For satin of the direction of stitches of this kind the program depending on complexity of a trajectory counts. And therefore in certain cases the directions in which stitches are located, can look, to put it mildly, strange. Also the editor usually automatically, on the algorithms, sets a form of corners. But some editors allow the user to choose other type of a corner if it doesn't like that the editor applied. It is especially important to pay attention when you change sateen width to a form of corners. And it is always difficult to operate a form of corners for this purpose like satin To satin of constant width, it is possible to apply and impressive filling. In this regard it a little than differs from usual satin. It is possible to be played with a form of a profile and the ends if the software allows: It is possible to create effect of fragmentary edge, having adjusted its parameters. Or to make gradient decrease or density increase on trajectory length, both having used the standard offer, and having adjusted values of density independent.