Recently I've been thinking how one can match a needle and a thread in thickness without consulting any guides. In theory, according to the manufacturers' booklets, everything is very simple: threads should be 40% thinner than the needles. That is, a thread should as thick as a long groove on a needle that plays an important part in forming a stitch.
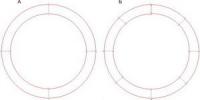
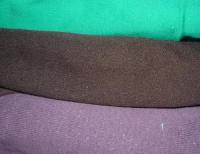
This is shown in the following picture:
In picture 1, the thread is much thicker than the long groove of a needle. This is fraught with the twisting of the thread, skipping stitches, flagging, and thread tension problems.
In picture 2, the thread fits tightly into the groove, which results in fine, crisp stitches and precise thread tension, because the thread slides along the groove, keeping friction to a minimum.
In picture 3, the thread is very thin and the groove is too wide for it, which leads to uncontrollable loop formation, stitch skipping and, again, tension problems.
In theory, everything is clear, but how does one determine it with a thin needle and thread? After all, you cannot see distinctly, whether the thread fits the groove or not. And you are not going to pick up a magnifying glass every time when you need to match a needle to a thread, will you?
The only system that shows the thread thickness is TEX, according to which we could calculate the thickness of a needle, using the rule of proportions. But if we don't know the thread's TEX as there are no inscriptions on it concerning its thickness, what can we do?
It turns out that there is an answer to this awkward question. As usual, it is quite simple:
Cut a piece of the thread with which you plan to embroider, about 45–50 cm long. Take a needle that seems appropriate and thread it like you do with an ordinary thread. Pick up two ends of the thread so that one end is 20–25 cm higher than the other (the thread should be at 45°). If the thickness is chosen correctly, the needle will move slowly down the thread under its own weight. The needle should not stop anywhere (if it does, it's too thin) or to move too freely (in this case it is too thick). Our task is to find the thinnest possible needle that will slide down smoothly. P.S. I found one more way of matching a needle to a thread. It is very similar to the previous one but I'll describe it anyway:
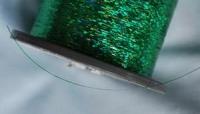
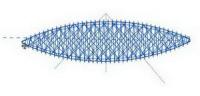
Cut a piece of the thread with which you plan to embroider, about 45–50 cm long. Take a needle that seems appropriate and thread it. Pull the thread from both ends vertically, as in the picture below. The needle starts to slide down the thread:
If it rotates a little around the thread, this is a match. And if the needle doesn't rotate or doesn't encounter any resistance on its way, it is a bad match. Frankly speaking, I think that you need some experience to do this test, i.e. you need to watch how the needle behaves on a thread in various cases. It seemed to me that the second method of matching a thread to a needle was in no way representative and somewhat contentious. According to it, you can use an ordinary #40 thread with a #65 needle.
- Read more...
-
- 2 comments
- 5,019 views