Jump to content

Articles

Our website articles

Original text by Marina Belova 
I've long been asking myself: why does every machine embroidery editor list a manual stitch among its types? When, where and how one should use it? In theory, this knowledge is the bedrock of machine embroidery design digitizing, but I, for some reason, am only familiar with the most general concepts. 
Come to think of it, if this type of stitch is omnipresent and not one manufacturer has discarded it, then there must be a reason for keeping it.
Then why are the clear instructions are so hard to find? 
A manual stitch is at first sight very similar to a running stitch. Where it differs it that when you digitize it, every click of a mouse creates a reference point, which is also a puncture point. There will be no other puncture points except these ones. Therefore, a digitizer gets complete control over the number of stitches. At the same time, when you digitize a running stitch, the software generates additional puncture points between the reference points. The number of these puncture points will depend on the set stitch length value and several other parameters like chord gap length, stitch length variations, etc., and on the software itself. 
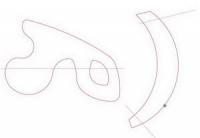
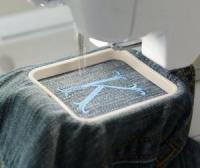
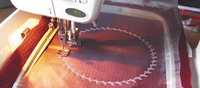
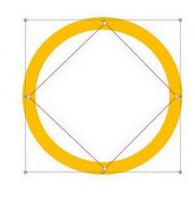
In the picture below you can see a circle digitized in manual stitches: 

No matter how I try, I cannot create a circle in 5 clicks. But I can create a perfect circle in 5 clicks using a running stitch with 3 mm stitch length and controlling the reference point type: 

 
What purposes does the manual stitch serve in machine embroidery? 
You can use it to handle tie-offs manually, at the beginning of an object as well at its end.  You can draw create a strengthening layer under the small letters.  Or even digitize the very same letters with it.  You can render the details that don't come out good in the automatic mode.  Judging by these scarce findings, a manual stitch is the domain of the professionals. In order to successfully apply it, you need to have a hawk's eye and a vast experience, for you have to have a clear understanding of where exactly do you need a puncture point and why. After all, the editor does very little to participate in digitizing: every stitch is drawn by hand and does not automatically comply when you change the design size or aspect ratio. 
And for what purposes do you use this type of stitches? I myself do not use it at all. 
Original text by Marina Belova 
Several days ago I bought waffle weave towels and came up with the idea of attaching the embroidered eyelets to them (you can download the design here). Observing the textured surface I like so much, a question popped up in my head: are there any special rules for embroidery on this fabric? 
It's not that I've never before embroidered on this cloth. I actually had more than once. It's that I've never thought what one could do to with it to get the embroidery of a high quality. It turned out that waffle cloth is not at all scary, on the contrary, it's rather stable. That is, if you don't count the cheap and loosely-woven waffle cloth that has a very low density and needs to be approached from a different angle as a consequence. Read more about loosely woven fabrics here. 

The technique is actually simple and not really different from a standard procedure: 
Hoop the fabric together with a backing (a middle-weight tear-away stabilizer will be just fine) and a water-soluble film on top. If you're trying to cut down expenses, I'm sure that you can do without the topping or simply put on top of the design a piece of a corresponding size. A tear-away stabilizer can be additionally secured with a temporary spray adhesive.  You can use threads of any thickness and structure.  Choose the needles with SES points, their thickness matching the thread thickness.  Digitizing a machine embroidery design for the waffle cloth 
The process of creating a design or choosing a ready one for this fabric will be defined by its texture: 
Avoid light-weighted designs executed in running stitches or containing a low-dense fill. (Though, in my opinion, this is a moot point.)  Do not embroider small letters directly on the fabric but on an underlay.  Standard density values are best: 0.4–0.45 mm will be sufficient to thoroughly cover the fabric. Density could be reduced due to the use of understitching.  Use stitches under 7 mm long, as usual. Anything longer than that should be split. For the fills, I'd recommend using stitches no longer than 4–4.5 mm. At any rate, the designs I'd embroidered looked better that way.  When working with a textured fabric, the most important thing is not to forget the underlay that will even the surface and maintain the edges.  Under thin satins – an edge run.  Under the satins from 2.5 to 7 mm – a zig-zag + an edge run.  Under the fills – a grid at 90° or a full grid at 45° and 135°, 3 mm stitch length + an edge run.  Compensation should be kept at a standard level of 0.4 mm.  It is beyond dispute that the fabrics differ in texture, density, and stability. For that reason, all of the above figures should only be regarded as a benchmark that may and should be modified for every particular design. 
P.S. Some interesting information from Deborah Jones concerning waffle cloth. She strongly encourages to wash the towels prior to the embroidery. The reason for this is a very high level of shrinkage (about 10%). In her video, she proves that washing before the embroidery is necessary for the light-weight designs like redwork but not so crucial for the ordinary dense ones.
Original text by Marina Belova 
It sometimes seems so strange to me when I hear questions the answers to which lie on the very surface. But then I realize that some newcomers might not be familiar it. 
For instance, it always surprised me that every machine embroidery course teaches you to draw from scratch, explaining what exactly do you draw and how. Not everybody learns how to use graphics editing software before embarking upon creation of the machine embroidery designs. 
So I won't discuss in a great detail precisely how and in what way the objects are created because it depends on the embroidery editor. Today I'll simply tell you what objects a user can draw. There only two types of such objects: 
1. A line. A line can be open or closed. 

The basic types of stitches that can be applied to the line: 
Running stitch  Satin column  Cross stitch  E-stitch  Motif stitch (macros)  Manual stitch  An area. An area is usually a closed object of a varying shape. Why usually? Because some editors permit filling the areas within the open outlines. 

The basic types of stitches that can be applied to the area: 
Satin  Fill  Contour fill  Spiral fill  Radial fill  Applique  Cross fill  To know more about stitch types, click here. 
What stitch type to choose for any object in particular, depends on its size, shape, outlines, its intended purposes, the desired decorative effect, and, of course, a digitizer's experience. All of this should be taken into account before digitizing has even started. 
Original text by Marina Belova 
I've long wanted to focus on knitwear, and finally, I got around to it. The first thing I saw was piqué. I've heard numerous horror stories about this fabric and even embroidered some pretty awful designs on it, and now it's time to straighten it all out. 
The key difference of piqué from an ordinary T-shirt is that it doesn't have a smooth surface. The texture of pique resembles honeycombs or a waffle. The fact that this type of knitwear is more vapory is what distinguishes it from the others and requires a special treatment. 
My own (unsuccessful) attempt at the embroidery on this fabric proved that the most important task of a digitizer is to avoid puckering so that the embroidery is soft and pleasant in wear. 
Embroidery on piqué – recommendations: 
Use light ball point (SES) needles. The needle size should not be over #75; #70 is optimal. The rule is simple: a thinner needle will damage the fabric less.  It's better to use #40 or #60 soft threads, for example, rayon or cotton, for small details. You can use polyester as well, but it is generally regarded as being tricky.  Piqué should be hooped. Together with a stabilizer.  The hoop should be as small as possible for a particular design.  Stabilizers. On this subject, opinions vary greatly. Tradition says to use 2 layers of a cut-away middle-weight stabilizer under the dark knitwear, with strands running in different directions. Under the light knitwear, use one layer of spunbond (a non-show mesh) because the cut-away will show through, and besides, it is not pleasant in wear. Additionally, you may use a temporary spray adhesive.  Piqué may be covered with a water-soluble film. I think it would come in handy for small letters and small elements of the design so that they don't sink into the fabric.  When creating a design, it's better to avoid large areas, filled with stitches. Large details better to be replaced with appliques.  Standard density values are 0.4–0.45 mm. But openwork designs are considered best of all for piqué.  You should avoid long stitches in the design. 3–4 mm is an optimal stitch length.  Pull compensation should be no less than 0.4 mm.  Understitching – single and double zig-zags. They may be combined with the edge run. A full grid should be put under the fills (in case the filled areas are present in the design, after all). Underlay should be moved further away from the edges than on an ordinary fabric.  The embroidery should be sequenced from the center outwards.  Try to plan your embroidery sequence in such a way that complex objects are embroidered in one direction in order to avoid gaps.  Segment overlap: no less than 2 rows in the fills and no less than 2 stitches in the satins.  Frankly speaking, you'll never understand how a particular design should be embroidered until you actually embroider no matter how profound is your knowledge of theory. That's what all of the above is: a basic theory of embroidery on piqué, nothing more. I began fiddling with piqué with the basic settings that I use for simple fabrics, positioned my design on one layer of tear-away sprinkled with a temporary spray adhesive for additional stability and only then hooped the whole thing and hit the start button. I used this stabilizer because I didn't have any non-show mesh for knitwear and I was trying to use what was available. 
The result was highly unsatisfactory – there were gaps between the neighboring outlines and there was also distortion. The fabric lost its shape while still in the hoop, which means that the stabilizer was ineffective: 

This how the fabric looked after unhooping: 

To get the whole thing right, I modified my design by increasing pull compensation both manually and automatically and also deliberately distorted the outlines in the direction I needed. Additionally, I put an underlay under the entire design, matching my fabric in color, that was meant to hold the design in place: After that, I placed my design on 2 layers of tear-away stabilizer and hit the start button. This is what I got: 


The distortion was still there but it had been visibly reduced, which meant that I was going in the right direction. The only thing left was to get rid of such defects as the gaps between the stitches in the white area and in the green core. Having solved that problem, I stuck my piqué on a middle-weight cut-away adhesive stabilizer and embroidered my third piece. This one came out best: practically no puckering. 

The resulting embroidery was rather dense. It appears that one can embroider a dense design on piqué if one chooses a right kind of stabilizer and modifies the design after doing some tests. In digitizing, guesswork will get you nowhere; you need to see the embroidered design to get a high-quality result. After having conquered this design, digitizing a twig from my article on contrasting colors for embroidery on piqué was kid's stuff: 

It was an openwork design and the result was very soft and nice to the touch, which is a big advantage for a T-shirt. Even an openwork design didn't get puckered. 
Original text by Marina Belova 
The August issue of the Impressions magazine contained an interesting article called Puffy Letters: Foam vs. Faux Foam by Lee Caroselli-Barners, in which a method of adding volume to the embroidery without using the 3D Puff was described. The method in question is quite similar to the traditional way of adding volume using multiple layers of understitching. Though it is unlike everything I've seen before due to the very low density in the upper layer of the embroidery and also due to the same stitch angle in the underlay and the finishing layer of satins. The author has a view that the low density in the finishing layer of stitches contributes to the effect of volume because of the dancing shadows created by it. She even invented a name for this method of adding volume to the embroidery – the Faux Foam. 
So why does Lee think of it as an alternative to 3D Foam? The answer is simple. It's all about automation and speed so you don't have to rack your brain over the following factors: 
You don't need to decide where to insert the walking stitches between the segments and the objects so as not to flatten the Puff.  You neither need to cover the open ends with caps that will perforate 3D Puff nor choose the right stitch angle for that same purpose.  You also don't need to avoid shortening.  The size of the design and its elements does not matter, you can make it the way you like.  No need to remove the 3D Puff leftovers using a variety of methods – the embroidery is clean.  Also, no need to buy 3D Puff.  Digitizing goes pretty much the same way as usual if you don't count the fact that you'll need to create 2 very dense layers of underlay for the wide elements and 1 layer for the narrow ones.
Under narrow elements, put double zig-zags 0.4 mm dense, their width being ~75% of the width of the finishing satin columns. Under wide elements, 2 layers of double zig-zags 0.3 mm dense. The width of the first layer should be ~60% and the second one ~80% of the width of the finishing satin column. The density in the finishing layer of stitches should be almost halved: from 0.6 to 0.75 mm. Such are the secrets of this technique, in a nutshell.
This is how the digitizing process should look: 

Claims to the simplicity of creation of a puffy design sound very enticing, therefore, I decided to give the method a try so as to see the result and to decide whether the volume created in that way it is any different from the one created by other methods. So I created 2 variants of a simple CD monogram – for 3D Puff (on the left) and for the new technique: 

The first impediment on my way was that not all machine embroidery editors allow the user to add as many layers of understitching as they please. As far as I know, only Wilcom has an automatic option of that kind (Wilcom is the software in which Lee, to whom have I have a lot of respect, creates all of her highly artistic designs). 
Those who own other embroidery editors will have to invest a lot of effort into the process that cannot be fully automated. I myself spend quite a lot of time manually drawing one of the two layers of understitching under the big elements. One should point out that the geometry of the upper layer is the same in both cases, apart from the slight difference in pull compensation values. The thinnest outline in my design is 3.5 mm; that includes 0.6 mm pull compensation on each side. 
Another surprise was the stitch count – it equaled 11700 with the Puff and 12455 without it. 
This is me embroidering with 3D Puff: 

Here the embroidery without the Puff is almost done: 

Below is the result with the Puff leftovers removed: 

Summary: 
You can detect the difference in volume right away: the embroidery is much less puffy without the Foam (mine was soft) but puffy nevertheless. To my chagrin, it's hard to capture with my camera.  The 0.75 mm in the thin outline of the upper layer seems far from enough. The edge looks jagged. In my opinion, the play of light and shadow created by the difference in density between the underlay and the finishing layer doesn't result in the promised volume effect.  But the 0.6 mm works splendidly.  My vote goes for the Puff. But I admit that the Puff will be hard to cope with in 1.5–2 mm outlines. No matter how hard I try to find a replacement for this rather costly consumable material, it has few really good alternatives. 
Original text by Marina Belova 
Every embroiderer ask himself or herself this question before beginning a new project: just how much threads will I need for it? 
If you have a single-head embroidery machine, the answer is simple – you buy one or maybe two spools of each color, depending on the project size. Overall not too expensive. But when you need to buy threads for a multi-head embroidery machine, the price increases proportionately with the number of heads. Whereas the real thread expenditure for a whole batch of products is ludicrously small. You're lucky if the colors bought are in demand, and you'll be able to use them for your other projects. 
Traditionally, the approximate amount of thread is calculated in the embroidery software. The process is very simple: open the file, read the design data and voila. The approximate upper thread to lower thread expenditure ratio is 3:1, at least, this what the embroidery software considers it to be. 
I've never yet seen that thread expenditure estimated in an embroidery editor was correct. You always have to adjust it. I usually multiply it to 1.5–2. 
There can be cases where it is impossible to open the file and to see the estimated thread expenditure. In a situation like this, you can turn to the manufacturers. Embroidery thread manufacturers also give you approximate algorithms for calculation. 
For instance, Gunold suggests this formula for thread expenditure calculation: every 1000 stitches require about 5 m of the upper and 5 m of the lower (!) threads (1:1 ratio). This manufacturer also states that the higher the machine's speed, the more thread is used. Madeira equals every 1000 stitches to 3 m or the lower thread. 
Gunold offers these thread expenditure figures in relation to the speed of the machine:
  Embroidery machine speed, rpm

650

850

1000

Estimated upper thread expenditure

1092 m

1428 m

1680 m

Estimated lower thread expenditure

765 m

1000 m

1175 m

It is not clear what stitch length people making all these calculations had in mind. The longer is the stitch, the more thread it will take. Chances are that an average value of 3–4 mm was used as a basis. Besides, nobody in the real world takes into account the thread tension on every head of a particular machine. If the upper thread is loose, the expenditure will be higher. More than likely, the manufacturers made their calculations for an ideal situation: 2/3 of the upper and 1/3 of the lower threads. Unfortunately, there are no algorithms that include the fabric thickness for better precision. 
Therefore, one should approach all those figures with caution. Trusting the figures given by a manufacturer used to lead me into traps. The real thread expenditure is much higher than the estimate. In all appearance, it's due to the reasons listed above. 
For example, Madeira and Amann write that one spool containing 5 km of #40 threads is enough for 1 million stitches. Respectively, a spool containing 1 km of threads should be enough for ~200 thousand stitches. 
In other words, Madeira and Amann suggest that it takes 4.6 m of the upper and 2.3 of the lower thread for every 1000 stitches. That is, the ratio here is 2:1. 
There are great discrepancies, as you can see. But using even those unreliable figures is better than buying threads in a hit-and-miss fashion. 
By the way, there is a website with an online calculator for those who are too lazy to calculate the thread expenditure themselves. 
Original text by Marina Belova 
I've long wanted to write about Filmoplast yet couldn't get to it: either there was no Filmoplast or a suitable project. Finally, I figured out what I can do: I'd embroider a monogram on a handkerchief and show you how to use this sticky paper and what purposes does it serve. This article is aimed at those unfamiliar the subject. And yet... 
Although I've learned how to use this paper a long time ago (or so it would seem), I was somewhat surprised when I visited the manufacturer's website in order to see the first-hand instructions. When you are not swamped with work and stop approaching everything from a professional standpoint, you are suddenly left with the time on your hands for experimenting and education. This makes me infinitely happy. When the work piles around, you rarely get a change to stick your head out and see what's outside. Though I may be the only one who thinks so. 
But let's call Filmoplast to the stage. 
Filmoplast is a paper covered with adhesive. You don't need an iron to glue it to the fabric, just hoop it with the checkered side up, tear away the protective skin (the one in checkers) that covers the adhesive and stick everything you like to it. 
This is how the Filmoplast looks: 

The checkers, as I take it, are necessary for precise hooping, and after you've removed the upper layer, the leftovers will help to align the item on Filmoplast. 
This paper is meant to enable the embroidery machine users to embroider on delicate fabrics and other materials, for which hooping might not be a very good idea: velvet, leather, dense corduroy, paper, and so on. That is, the materials prone to the hoop burn or those impossible to hoop simply because of their volume, such as thick terry cloth (the frames on home embroidery machines are too thin and ineffective for this fabric). Additionally, Filmoplast was intended for highly stretchy fabrics that list elastane among their components. Another purpose of using
Filmoplast is to hold various small size items inside the hoop without any special devices. For instance, cuffs, collars, ribbons, etc. Gunold even suggested embroidering caps with the help of Filmoplast. I didn't try it and, therefore, can't offer any comment. 
In my opinion, Filmoplast is nothing more than a costlier analog of the good old tear-away stabilizer + temporary spray adhesive combination. I myself prefer the stabilizer + adhesive combo simply because no matter how the German manufacturer praises Filmoplast as a stabilizer, it doesn't really stabilize anything, making it necessary to place something under the hoop so that to avoid embroidery defects. 
Besides, I utterly dislike the way Filmoplast comes off the wrong side. It either sticks sure as death and then tears off in tiny bits with fibers in them (velvet pile, for example) or it doesn't hold to the fabric and peels off during the embroidery so that you have to reattach it, which causes various mishaps with the outer look of the embroidery. Hence, not every fabric can be embroidered on this paper. 
So what did surprise me in the instructions on the German website? The way you can save on this rather costly material – it turned out that you only have to hoop a big piece of it once. They show it in great detail with pictures. 
And I'll show you how I embroidered handkerchiefs on Filmoplast. 
So I hoop a piece of Filmoplast: 

Make a cut in the protective skin: 

Attach my handkerchief to the adhesive, aligning it with the checkers that were left over after I cut out a hole: 

Embroider the design: 

Carefully remove the handkerchief so that not to tear the Filmoplast: 

Cover the hole in the paper with a small piece of Filmoplast which I press to the exposed adhesive: 


Attach a new handkerchief and resume the embroidery: 

This process goes on and on, until you've completed all the handkerchiefs. 
Here are the two of mine: 

Simple as that. It's never too late to learn. The thought wouldn't probably even cross my mind – I've always hooped a new piece of Filmoplast for every item. 
To think of it, I've already described a similar technique, which can be regarded as an alternative to using Filmoplast – hooping a double-sided adhesive tape. In this case, I could put it under the hoop instead of sticking another, small piece of Filmoplast. 
Original text by Marina Belova 
A connecting stitch serves to join different objects or segments of one object in machine embroidery. 
There are 3 types of connectors: 
Walking stitch – joins the objects (segments) with a running stitch.  Jump – no visible connection between the objects.  Run – a thread runs between the end of one object and the beginning of another.  I'll tell you a bit about each of these types of connector stitches. 
Walking (travel) stitch 
A walking stitch can be inserted between separate objects of one color as well as inside the object of a simple or a complex branched shape. 
In the picture below you can a walking stitch between the end of one object and the beginning of another – a classic travel stitch between the outlines. The objects are located at some distance. 

Travel stitches are commonly used when it is possible to hide them under other objects that will be embroidered later. 
Walking stitches between the objects of one color aim at minimizing the number of trims in the design and reduce the time spent on the embroidery. 
Notice that this trick won't work if the travel stitch is of a dark color whereas the upper layer of stitches is light-colored because the dark thread will shine through the light-colored fill and you'll be forced to trim. If the distance between the objects is up to 1.5–2 mm, you can spare the trim and use a walking stitch instead. 
Walking stitches between the segments on one object are shown below. 

In our days, when the digitizer's work is largely done by embroidery editors a digitizer only enters the parameters of the walking stitches, such as stitch length, the location of the stitch inside the object or at its edge, the amount of overlap between the segments, and the software defines their path. 
Walking stitches originated in manual punching times when there was no embroidery software. In those days one complex shape was divided into several simple ones depending on the stitch angle. And the simple shape was split into segments in accordance with the start and finish points in it. The puncher connected all the segments with the running stitches. This laid the foundations for today's walking stitches inside the outline. 
The advantages of walking stitches before jumps and trims 
the machine works at a higher speed  less thread breakage and thread slipping out of the eye  lesser time and higher productivity  Jumps 
Jumps are used to connect objects that are located at a distance so that the walking stitch cannot be applied. You get jumps when the machine moves the hoop but does not stitch. Usually, an automatic trim is inserted before the jump if the machine has a trimmer. There are no threads between the objects when using this connector – they are cut. 

As I stated in my article about embroidery navigation, it's better to minimize the number of trims in the design in order to avoid thread and needle breakage and thread slipping out of the needle. The economic factor should also be considered: every trim adds 7 seconds to the embroidery time and equals to approximately 65 stitches. That is, every trim slows the production. 
Runs 
Runs are almost the same thing as jumps. Just as jumps, they are used to connect the objects at a distance from each other. Only in this case, there is a thread between the exit point of one object and the enter point of another, though the machine doesn't stitch. You get this when the trim command has not been inserted. This is how it looks: 

This way of connecting objects in a design is quick and convenient for a digitizer, for you don't even have to think whether a trim is needed.
But, in my opinion, it adds the problem of cleaning after the embroidery is completed. Besides, some of the runs get under the objects that are embroidered later. And it is quite a task to clean the embroidery afterward, which is not at all economically efficient if you have line production. 
Original text by Marina Belova 
Let me switch off from the chevrons and show you how to make an eyelet for a terry towel (or any other towel, for that matter) with an ordinary patched appliqué. Here is a result of my efforts: a vibrant towel. It's a perfect time for it as the spring that keeps failing to come: 

This time, a well-known Smart Needle website inspired me to do the embroidery, so I decided to try. But I wanted something more delicate for a design. 
In search for a suitable one, I sifted through a bazillion of variants and settled at last on an Art Nouveau flower to which I added one more whorl for my eyelet. I got this: 

So I created a pattern. I decided against a double-sided appliqué, which it's commonly used for eyelets. My design is far too complex for that: 

I chose the fabrics for the flower: thin cotton pieces, something akin to muslin. 

After that, I proceeded to the most difficult part of the project – to the embroidery. 
As I was going to embroider at the very corner of a towel – an appliqué, of all things, going beyond its edge, – I wouldn't be able to hoop it. I'd need to glue it to a stabilizer. For that reason, I hooped 2 layers of a thin tear-away stabilizer with long fibers: 

Loaded the design into the machine and started the embroidery. First, I stitched the guideline in the corner. This is a very useful reference point for the precise positioning of a towel in the hoop: 

I sprinkled the stabilizer with a temporary spray adhesive and carefully tried to align the corner of my towel with the embroidered line: 

After that, I started the machine again and stitched a guideline for the appliqué fabrics. This very stitch would also serve for additional stabilization because one cannot rely on the temporary spray adhesive when dealing with terry cloth: 

I put a piece of fabric prepared for the leaves and stalks: 

And secured it with a small zig-zag, as it is my custom: 

Now we've come to the interesting part – trimming the extra fabric along the perimeter:
 
Terry cloth is not very easy to cut. No matter how good are the scissors: with the duckbill or the rounded ends – there still is a possibility of slashing the loops. Wouldn't it be great if... 
Having done the trimming, I replaced an ordinary bobbin thread with a green one, the same color I would embroider the stalks: 

After that, I switched on the machine and embroidered the borders around the stalks and leaves: 

As I embroidered at the corner of the towel and the hemline was rather thick there, I expected the needle breakage. But there was no such thing. I think that on a home machine this trick will not work, with all these layers. 
Because of the loops being small and sparse, I decided against a water-soluble film or a plastic bag in order to avoid loops showing through the stitches. It turned out to be a bad decision: the loops still showed through in places where there was no appliqué fabric under the satins.
Under the appliqué border everything was perfect, but under the embroidery, the things weren't quite so good. It's not exactly a tragedy, but a number of loops managed to come through, especially between the split satins. 
After that, the machine stopped and I put the next piece of fabric for my flower: 

I also changed the green bobbin thread for a pink one: 

I hit the start button and stitched the pink fabric along the perimeter of the flower: 

Now I trimmed the extra pink fabric: 

Started the machine again and embroidered the rest of the design: 

Took it off the machine. The wrong side looks quite decent, the only thing I need to do is to remove the stabilizer:
 
Here, I tore the most part of it away: The only place where I chose not to tear it was on the eyelet. But inside the eyelet there was a small digitizing mistake: 

If the stitches ran perpendicular to the edge and not along it, they wouldn't have frayed after I removed the stabilizer. But his can be repaired – all I have to do is to gather the threads and to sew them back on. Let nothing be wasted. 

Now I need to see how the embroidery will behave after many washings. I'm curious.
Original text by Irina Lisitsa 
To succeed in machine embroidery business, it is necessary to have a narrow arm extension that will allow you to embroider virtually any area of an item. Home sewing and embroidery machine lack this advantage and also lack a set of small frames. Brother VR embroidery machine is a unique piece of equipment that has the functionality of both home and industrial embroidery machines. 
A narrow arm extension, a set of small embroidery frames developed specifically for the embroidery in hard to reach areas – here you find all of that, combined. 

Embroidery in hard to reach areas: what is it? 
To begin with, what are hard to reach areas and why machine embroidery in them has its unique features? Look at the picture below. The areas marked red are hard to embroider on a machine with a wide arm extension. If you compare the upper and the lower parts of the image, it'll become obvious that Brother VR allows you to position a design anywhere on an item. 

Embroidery in hard to reach areas: how to? 
Trousers are one classic example of a tough-to-embroider item. Cylindrical shape of a trouser leg prevents you from positioning it on a platform of a horizontal shuttle embroidery machine. Unseaming is an option, but what if you have no desire of doing so or your client objects?
Cylindrical shape of the Brother VR embroidery machine platform allows you to hoop the trouser leg without opening the side seams. Hooping becomes much easier if you attach a stabilizer, hoop the trouser leg and slip it on a narrow arm frame. 

You can embroider almost any area of an item on a cylindrical frame. 
With Brother VR, you'll be able to embroider the upper part of a sleeve in blouses and shirts, which is why you need a small frame. The machine is equipped with a wide selection of frames that are suitable for the variety of tasks. For the embroidery on pockets, use a flat frame of a corresponding size, this will allow you to avoid ripping the finishing line and to keep the factory-made seams. 

Brother VR embroidery machine: embroidery in hard to reach areas made easy! 
Original text by Katya Ebber 
Having stumbled upon this jumper on the internet, I simply couldn't pass it by. Creation of the design didn't take much time unlike the choice of the materials and the technique compelled me to try several fabric + stabilizer combinations. A cut-away stabilizer proved the most effective: the embroidery maintained its shape even after washing. 
This master-class will tell you how to do openwork embroidery on medium density knitwear with the use of a cut-away backing. 
Materials for this master-class: 

Spray adhesive  Upper thread  Underthread  Machine embroidery design  Cutaway non-adhesive stabilizer  Filling-knit fabric or ribbed fabric  Openwork: the making process: 
Hoop the cut-away non-adhesive stabilizer. Sprinkle it with a temporary spray adhesive and press the fabric to it facing up. 


Insert your hoop into your machine. Load the design, hit the start button and embroider the first color with the running stitches. 


After that, the machine makes a stop as if for a color change. Take the hoop off the machine and make incisions in the fabric and the stabilizer inside the closed objects using sharp scissors or a cutting blade. Carefully cut the pieces of fabric and the stabilizer out, keeping close to the running stitch. 


On top of the fabric with the holes, place a layer of the water-soluble stabilizer. Secure it with a basting stitch or with pins. 


Insert the frame into your machine and restart the embroidery. The machine will stitch the zig-zag stitch and the finishing satin column. The main part is now finished. 


You only need to remove the basting stitch, tear away the water-soluble stabilizer and cut the backing along the contour, leaving a small allowance. 


Your openwork on knitwear is ready. 


Original text by Lisa Prass 
For Brother embroidery machines, a special border frame can be purchased. It has a somewhat different fixture system that enables quick and precise framing of the material and, consequently, perfect alignment in repeating borders. Brother Innov-is I and Innov-is Ie sewing and embroidery machines have an inbuilt camera that, together with a border frame, can perform miracles. 
Brother Innov-is Ie border frame 
I won't describe border designs creation in this article; if interested, you can always ask a question in the community. This masterclass is aimed at highlighting the process of embroidering borders in a frame. The work process includes embroidery machine preparation, construction of a design in the embroidery software and the embroidery itself. If you have a Brother Innov-is I, I suggest consulting the following chapters in the operation manual: 
"Changing the frame size" (pp. 238–239) – this chapter tells you how to set the 100x180 frame as your default border frame. 
"Creating repeating borders" (p. 286) – this chapter contains the detailed information on the creation of the continuous motifs. 

Creating marks for further alignment Set the start and finish points of a design as shown in the picture. A is a start point, B – a finish point. 
You can find all the information on how to create a design in the operation manual! Stabilizers should be used when using border frame, especially when embroidering on soft fabrics. Of course, if you are a pro, you will be able to afford embroidery without a stabilizer, but if you are a new to machine embroidery, be sure to use it. Border frame will never excuse such a liberty in a novice! 
Materials: 
Fabric  Stabilizer (adhesive tear-away)  Upper thread  Underthread  The making process 
Glue a cut-away stabilizer to the fabric. Draw two guidelines. The first one is to position your design along. The second line is a start point. 


A side note: This master-class shows how to position a design along the guideline that marks its border. This is not a rule set in stone. In future, after you'll gain the experience of using a border frame, you'll be able to position your guidelines as you wish. 
Fix the fabric in a frame, aligning the guidelines with the notches on its sides. Place the pattern on top of the hooped fabric and make sure that you've hooped it neatly and evenly. Keep in mind that the guidelines should not go beyond the embroidery area. 


A side note: In a second photo the lines are placed exactly on the edge of the embroidery area; in case the design is smaller than the frame, it is not necessary to adhere to such arrangement. The guidelines may go beyond the embroidery area. The important thing is to keep them parallel to the grid. 


Insert the frame into the carrier and activate the camera (the one that shows the needle position, not the one scanning the design on fabric).
Align the design so that it starts in the right-hand corner and continues along the right side. Make sure that the first stitch in the design (a green cross) falls onto the second guideline that marks the start point of a design. Hit the start button. 
The machine will stop after embroidering an alignment mark you've decided upon while digitizing. 
Having finished the embroidery, reframe the fabric, placing the already embroidered piece outside. Maintain the guideline position by aligning it with the notches. Start the camera (not the fabric scanning but the needle position one!) and place the needle above the center of a mark.
Start the embroidery. 

 
If did everything in the right way and maintained the guidelines position, the successful embroidery is assured. Repeat this as many times as you wish. 

It's better to use vanishing fabric markers for drawing guidelines. The tailor chalk I used here didn't come off even after I washed the item with Fairy. 

And don't forget that the border width should not be over 100 mm and the border length – over 180 mm. Good luck with your embroidery! 
Discuss in the community 


Original text by Irina Lisitsa 
Circular embroidery may cause trouble for newcomers. It is not as difficult as it may seem. The only thing you need to do is to follow instructions that will much simplify the task and speed up the process. This masterclass will teach you how to digitize a design in the embroidery software, properly position it on an item, align circular blocks, then cut the fabric for the future napkin and finish its edges. As a result, you'll get an elegant napkin decorated with Christmas embroidery. 
Materials: 
Fabric  Thin sewing interfacing fabric  Tear-away adhesive stabilizer  Embroidery threads  Ribbons for decoration  Water-soluble marker or tailor's chalk  Machine embroidery design from BFC-Creations collection  Let's combine the designs in the embroidery software: 
Although in this masterclass I use Wilcom software, you can use any one you like. And if you don't yet have any, draw all the lines and marks right on fabric. 
Using the vector object drawing tools, create two circles of the same diameter as your future embroidery. The diameter of the first circle (marked white in the screenshot) is equal to the inner diameter of an item, and the diameter of the second – to the outer one (marked gray). 
Using the Straight Line tool, add the center lines and diagonals between them. Using the Rectangle tool, draw an object the size of the embroidery area of a particular hoop. Duplicate the rectangle a required number of times, arranging the objects in such a way that the hoop outlines overlapped. 
Save every part of the design under the unique name in the same order they will be embroidered. When saving the designs, make sure that the alignment crosses are present in both. This will enable quick and efficient alignment. 


In accordance with the hoop centers, draw the diagonal lines. Straight lines and diagonals will work as guidelines when you will trace your design onto the fabric. 


Load the chosen designs into the software. Arrange them in a circle in accordance with the lines. To do that, use the Kaleidoscope tool. 


In places of joint, put the alignment stitches or crosses. 


Save parts of the design each under its own name in the same order they will be embroidered. If necessary, adjust the embroidery sequence (objects, flowers) in order to save time. 


Aligning circular blocks 
Preparing the fabric: 
If your fabric is thin, strengthen it with one layer of interfacing of an appropriate density. Print the template and trace the guidelines, alignment crosses, center points and diagonals onto the fabric. 
Glue the tear-away adhesive stabilizer to the wrong side of the fabric where the first design will be placed. 

Load the design into your embroidery machine and make sure that the fabric is correctly hooped by using the plastic template overlay that comes with your embroidery equipment. If necessary, rehoop the fabric or move the design in the machine, using the Edit option. 


Embroider your design. Take the fabric out and iron it slightly to remove the hoop traces. 


Glue a tear-away adhesive stabilizer to the fabric where your second design will be placed. Hoop the fabric in accordance with the marks and the design, already loaded into the machine. Plastic template overlay will aid in correct and quick positioning. 


If your machine has a fabric recognition option, scan the fabric you've just hooped. 


Check the design position against the alignment crosses or the scanned image. Embroider your design. 


Embroider the remaining parts in the same fashion. After having embroidered the circular design, carefully remove the alignment crosses. 


Embroidering a round napkin 
Fold the detail in two and draw a line with a water-soluble pen, then fold in the opposite direction and mark it. This will be the center line of your napkin. 


In order to draw a neat edge, use this simple method. Fold your fabric in four. Pick up a strong thread. Tie one end to the pen and the other – to a nail or a needle. Insert your nail in the center of your future napkin and draw the edge of an item with a pen in the way you'd make a circle with the compasses (you can use a ruler instead). Don't forget seam allowance if you're going to turn-up the edge. 


If you're going to finish the edges with a border, seam allowance won't be needed. 
If the fabric sheds, overlock the edge, turn it up and iron it, then add a blind hem on your sewing machine. Finish the openings with the basting stitch or make them into lacing holes. Draw various decorative ribbons through and tie them in knots. 
Now the edge is finished and the napkin is ready. 


P.S. You can choose from a wide variety of Christmas designs in our shop. 
Original text by Marina Belova 
A long time ago I saw Deborah Jones' video on how to prevent metallic threads from twisting if you don't have a special net cover – using a small piece of Styrofoam. You can also couple it with the net cover for the combined effect. Styrofoam is that thing they put in packages to fill in the empty space when the item is smaller than the box, in order to prevent it from crumpling or breakage: 

Debora's idea stuck in my memory, but I kept thinking why use Styrofoam at all – on commercial embroidery machines a metallic thread travels a long and complicated path and straightens out on the way. Only when confronted a home embroidery machine had I understood the necessity of this ploy, as thread tension regulation on those is a very confused matter, especially if you embroider with something more complex than an ordinary rayon or polyester thread. 
The tricky thing was to obtain Styrofoam – I haven't received any packages for quite a long time. Suddenly an idea sprang to my mind: why not substitute it for the heat insulator with which I tried (unsuccessfully) to replace 3D Puff? In the end, this very material was used not only to solve the problem of twisting but also to adjust tension for the threads of any quality and structure. 
As a result, the thread supply system on my home Brother now looks like this: 

I cut a circle out of the insulator and put it on a spindle used for the small spools: At first, I drew the thread right through the circle by threading a needle and piercing: 

But then, having grown weary of this, I made a small V-shaped cut and inserted the thread down to the very end. In this way: 

I didn't register any difference in the quality of thread tension. All these methods work equally well. So, why all the undue effort? 
Of course, I didn't spend money on special stands for driving threads from big spools to the machine or a machine that rewinds threads from big spools on small ones. All of this can be easily replaced by what is at hand. Instead of a rack, I use a belt hung from a shelf, with a binder clip through which the thread is driven. And the spool sits on the table, simple as that. 
So much for this little gimmick. Now, this circle has a permanent residence on my machine and helps a great deal. 
P.S. I think I've seen somewhere a piece of foam plastic used to the same effect. 
 
Textile toys can make an unconventional and creative present. They can be given as gifts to the occasion or even without one, just to please someone you love. Today I'll tell you how to make a ball on your embroidery machine. Depending on the chosen fabric, its color, and the design, the ball can become a kid's toy, a decoration or a souvenir. 

Embroidering a ball. Materials: 
Sole-colored non-stretchy fabric  Padding Tear-away adhesive stabilizer  Upper thread  Underthread  Scissors Machine embroidery design 
Embroidering a ball. The making process: 
If you have prepared the materials, let's begin. Load the design into your embroidery machine, choose the thread color that suits you and matches your fabric. Strengthen the fabric with a tear-away stabilizer. 
I used a tear-away adhesive here, but you can use a tear-away + temporary spray adhesive combination. 
Insert the hooped fabric into your machine and hit the start button. 

In order to create the ball, you'll need to embroider 12 identical pieces. If your embroidery machine has a large frame, this won't take long. In that case, you'll be able to embroider several pieces at once. If the frame on your machine is small – well, arm yourself with patience. 
In any case, the embroidery is not the most toilsome part of the job! 

When finished with all the pieces, carefully trim the fabric along the outer outline, leaving 0.5–1 cm for seam allowance. 
The most difficult part is joining all the parts into a ball. In order to get one, you'll need to carefully sew all the pieces together. Below you can see a picture that will help you to assemble the ball quickly and easily. I found it on the Web and haven't seen anything more useful for the purpose. Join the parts using back stitches in the outer row of the design. You can do that on a sewing machine, but in that case, perfect register and the neat outer look would be harder to achieve. 

The ball consists of two parts, so to speak, each having a pentagonal bottom, around which the pieces are attached. Then, you join these two parts together. When the item is almost sewn up, you need to add filler. Any one will do: cotton, wool, chlorofibre, polyester batting, underwool, etc. 
The more carefully you stuff your ball, the rounder and more beautiful it will be. 

Embroider your own textile ball, play with colors and sizes and surprise your friends! 

Original text by Olga Armyakova 
Broidery Magazine 
A wide variety of stabilizers is used in machine embroidery. Today we'll dwell on the subject of water-solubles. 
Given that the only the imported stabilizers of this variety can be found on the Russian market, here's the list of names that you may read on the package or a website: 
Water-soluble  Wash Away Stabilizer  WSF  Water-soluble film  Dissolve stabilizer  All of the above denote stabilizers that are removed by water. 
They are commonly used as a backing, just as their cut-away and tear-away counterparts. Equally, this is the only type of stabilizer that can also serve as a topping or as your base fabric without any additional materials.  Water-soluble stabilizers are used when absolutely no traces of additional materials are tolerated. Along with that, they do not contain formaldehyde and, therefore, can be used in underwear and other items where the embroidery is intended to come into contact with the skin.  Water-solubles can be removed the moment the embroidery is completed or while washing. Having finished the embroidery, you can easily cut or tear the extra stabilizer beyond the outlines of the design, and the bits within them are destroyed with steam or damp sponge. If necessary, a water-soluble stabilizer is washed away in the running water or first soaked in water and rinsed afterward.  To dissolve the stabilizer in water, use the temperature between 10 and 40° C: this way the color and other fabric properties will stay intact. Just how long it will take, depends on the manufacturer. The higher the temperature, the quicker the stabilizer will dissolve. I strongly advise against heating the water too much: the stabilizer leftovers may turn into lumps and solidify.  Make sure to read the stabilizer specifications, because they might contain important points on how to work with this particular type.  In general, water-solubles expire in 1 year. Better to keep them in a box in a cool dry place away from direct sunlight. Once the expiration date has passed, try to use your stabilizer as quickly as possible, otherwise, it will lose all its properties. This is especially true for thin water-soluble film. 
CHOOSING A WATER-SOLUBLE STABILIZER: 
In order to choose a right stabilizer for machine embroidery, you need to take into account the following factors:
The structure of the fabric, type and properties of the fibers  the density of the embroidery and whether the embroidery will come into contact with the skin For a lacy design embroidered with polyester threads two layers of lightweight stabilizer will be sufficient, but the same design embroidered with metallic threads will require a denser one.
Let's try to sort the wash away stabilizers into categories and describe their fields of application. I will hereafter use the most common names in circulation. 
WATER-SOLUBLE STABILIZER: DENSITY 
The principal characteristic of a water-soluble stabilizer is its thickness (specified by the manufacturer in microns) or density (g/m2). 
Thin, or lightweight stabilizer 
Thickness: 10 microns 
Composition: Different manufacturers specify different raw materials: 100% polyvinyl alcohol or 100% modified rayon. 
The product looks like a thin plastic film. It is used to prevent the stitches from getting lost in heavily textured fabrics. For example, in knitted garments or ones made of terry cloth, also in piled fabrics. First, you create a stabilizer-fabric-stabilizer "sandwich". Then, in case the fabric is thin or you have an outline embroidery design, you hoop it. 
Medium-weight 
Thickness: 20 microns 
Composition: 100% polyvinyl alcohol or 100% modified rayon 
Some manufacturers' wash away resembles a non-woven cloth, akin to the interfacing material used in sewing, others' is like a thick film. Use it to strengthen the tricky fabrics whenever stabilizer must not be seen. On see-through fabrics, for example. You can use several layers of medium-weight stabilizer spare the fabric. 
Heavyweight 
Thickness: 30 microns
Composition: 100% polyvinyl alcohol or 100% modified rayon 
This one looks like a very thick greenhouse covering film. It is used for embroidering FSL or 3D designs. Fix it in the hoop without your main fabric. The design should be created in such a way that all its elements are interconnected, in order to prevent it from falling into separate pieces once the stabilizer has been removed. 

Water-soluble stabilizers in machine embroidery 
WATER-SOLUBLE STABILIZER: VARIETIES 
Unfortunately, there are not many brands of water-soluble stabilizers on the Russian market at the moment. Nevertheless, machine embroidery in our country is buoyant. Many consumables, and that includes stabilizers, can be ordered from online shops. For this reason, I'll describe all types of wash aways that can be found these days. 
First three or four types are non-transparent non-woven fabrics. 
Adhesive 
This is a water-soluble stabilizer with a paper backing. A spray adhesive and a stabilizer rolled into one. Pull away the paper to expose the stabilizer's sticky side. Stick it onto the embroidery area before or after hooping. Having done the embroidery, dissolve it in water. 
This type of stabilizers is used as a backing. 
Fusible 
A tear-away, webbing-like stabilizer that is pressed to the fabric with a warm iron. After the embroidery is completed, it is rinsed away with water, leaving no trace. 
Preventing the fabric from shifting, it is as handy as the adhesive stabilizer, and is, too, used as backing. 
Mesh 
Dense wash away stabilizer that is used for FSL and other laces, or heavily textured fabrics such as velvet, corduroy or knitwear, and also diaphanous and light-colored ones. 
Transparent film 
Is placed on top of knitwear or heavily textured fabrics. Its main purpose is to prevent the stitches from sinking deep. 
The film's advantage is that you can see the fabric and the design through it. That allows us to avoid problems that may arise when we join the designs or their parts together. 
This kind of stabilizer can be used instead of the fabric for such things as 3D designs or FSL. 
It takes a trained eye to define whether the thin transparent film will be able to withstand the pressure of the design at a mere glance. 
Liquid 
Soak the fabric in it prior to the embroidery and let it dry. Embroider your design and wash the design in water. 
Water removable spray 
Is sprinkled onto fabric prior to the embroidery. Be certain to let it dry properly before starting the embroidery. It is rinsed away with water once the embroidery is completed. Besides the spray, you can use the starch powder for ironing that comes in aerosol form as well. 
There are also such domestic methods of firming up fabrics with gelatine or starch, which can be considered the subvarieties of the last one. 
CONCLUSIONS 
Every stabilizer has its specifications and user's manual. I advise you to create a special file to keep track of all the stabilizers, needles and threads used in every project. This will make your future choices much easier. 
Dense water-soluble film. You will easily discern it by sight. It looks very similar to the greenhouse covering material. This stabilizer is used as a backing for laces or, sometimes, as a background fabric. 
Thin stabilizing film. This type of stabilizer looks like a thin polyethylene bag. It is primarily used as a topping to prevent the stitches from sinking into the fabric. 
Dense wash away stabilizer. This one is used as a background fabric for laces. It looks like a sewing interfacing material. 
If the stitches have sunk and the resulting embroidery looks untidy, try choosing another stabilizer or use two layers of the present one, also readjust the thread tension or simply change the bobbin thread and see whether it makes any changes. If nothing helps, blame the design. 
SOME TIPS 
When using the fusible stabilizer, make sure that the iron is set at the lowest temperature possible and do without the steam, otherwise, your embroidery will suffer.  Don't throw away the accompanying materials to your consumables. It may contain important information, such what time does it take for a stabilizer to dissolve and at what temperature, the density, the brand name and the item number. Staple this information to the stabilizer's package. In future, it will make the process of choosing a right fabric in a shop much easier.  Don't throw away the stabilizer leftovers after the embroidery has been cut out. In future, they might come in handy: arrange them in the embroidery area of a hooped fabric, and they'll do just as good as a whole piece.  For denser designs and thicker fabrics, another layer of stabilizer may be needed. I recommend testing the design and the fabric first, in order to estimate the required number of layers.  Provide yourself with several pieces of stabilizer that will fit your hoop. It is not too demanding a task; arranging those pieces in the hoop in advance will save you time and fabric.  Before using a water soluble topping, make certain that your fabric doesn't fade.  When embroidering on knitwear with a film on top, don't forget to stick the background material to the underlay – it will prevent puckering.  Small trims can be dissolved in warm water and used as a stabilizer liquid to temporarily fix the tricky fabrics. 

Creating bed linen, tablecloths, napkins, even garments, you may need to sew two different pieces of fabric together. This masterclass shows how to do that with the help of the embroidery. It also shows how to decorate a seam with an array of flowers. As the result, you'll get two pieces of fabric stitched together, and the seam will be hidden away. In this masterclass, we join two pieces with curved borders. If you want to stitch pieces with even borders, you'll need another design for that. 

Embroidery sewing. Materials: 
1. Tear-away non-adhesive stabilizer 
2. Temporary spray adhesive 
3. Upper thread 
4. Underthread 
5. Machine embroidery design 
6. Two pieces of fabric of different colors 
The process of embroidery sewing goes like this: 
Hoop the cutaway non-adhesive stabilizer. Insert your hoop into the machine and stitch the outline. Add a layer of spray adhesive onto the stabilizer. Press a piece of the light-colored fabric in the center of the hoop area. 

Change the thread color and stitch the outline again. Cut the fabric close to the stitched line. Place the second piece of fabric, a dark one, on top of the first. Position it in such a way that it covers the outline with 1 cm margin. Embroider the third outline. Now cut the dark fabric. 

Insert your hoop back into the machine and embroider the design. The closely spaced elements will hide the seam. 
This is how the ready embroidery looks like, front and back: 

Remove the tear-away stabilizer from the back of the fabric. Iron the embroidery from the wrong side. Carefully use steam in order to prevent puckering and waves. The embroidery is ready! 

Original text by Marina Belova 
On the map of my machine embroidery journey, I've reached another white spot – embroidery on the oilskin. As the rumor goes, this fabric, once washed, puckers like mad, and no matter how much ironing you do afterward, the damage will stay forever. So I've decided to try and see with my own eyes, what should be done and how to make the embroidery at least acceptable. 
Little as I know about oilskin, it is enough to understand how to create a design and to plan the embroidery sequence: 
It is a woven and, therefore, rather stable fabric.  It is thin.  And slippery, too.  It's coated with a special substance that repels water. And the embroidery damages the fabric, making it permeable to water in the places where it had been punctured.  Given all mentioned above, I can say that: 
One would need the smallest hoop possible.  Cut-away stabilizer is the recommended choice for oilies. But I'm gonna pick the stabilizer I use for everything – a cheap middle-weight one with long fibers, made in Turkey, which was sold to me as a tear-away. It tears in any direction, leaving long fibers.  The type of the design does not matter. This is my own deduction: people usually embroider what they want or need to, and not what is recommended for this particular fabric. As a commercial embroiderer, you work with what the clients have brought you, and that includes simple designs as well as big and stitch heavy ones, with lots of fills.  There is not much sense in making the design denser, therefore, density value stays as it is. What you perhaps should do is to lower it, then adding a lot of understitching to compensate. Whether it works, we'll see after doing the test pieces. Don't forget, the more punctures I make, the less watertight the fabric becomes.  In my opinion, the only change one should do is to shorten the stitches in the underlay so that the fabric sits as tight as if it was nailed.  I decided to experiment a little and embroider several outlines with different stitch parameters. So I created 3 outlines: narrow 1.5 mm satins, also 5.5 mm satins and the filled squares. The density in the outlines on the left is 30% lower than my standard one (5 lines/mm or ~0.4 mm). The underlay stitch length in the less dense outlines is set at 1.5 mm along the perimeter and under 2.5 mm in the center.
Under the wide satins and the fills lies the underlay is denser. The outlines on the right have standard density, but I used short underlay stitches only in the edge runs, and 3–3.5 mm ones everywhere else. 

All of my test pieces (see below), while still in the hoop, were pulled in more or less the same fashion, but the outer look is different in every case. The lack of density is very much visible: the fabric is not entirely covered with stitches. 

If you hold them to light, you can see that the perforation along the outlines is approximately the same, except the narrow satin column, top right: 

After unhooping, the amount of pull in all three test pieces is roughly the same, no matter what stitch parameters were used: 

Looking at how the tests came out, I reached the following conclusion: you can lower the density of the upper stitch layer only slightly, to avoid damage to the outer look, and you should use shorter stitches only in the edge runs; the rest should stay as it is. 
This mosquito was the result of my efforts: One can see that, both before and after unhooping, the surface of the fabric stayed even, despite the 12000 stitches having been added to it. Nothing shifted. 

Nor would I say that the puckering was oh so awful – this is how it looked before pressing: 

It turns out that the embroidery on the oilskin isn't difficult at all. 
And what about the punctures? Some say that you can lubricate the threads with 100% silicone or natural wax, that will fill in the holes, serving as a stopgap. Whether it is true, I do not know. But Gunold recommends strengthening the wrong side of the waterproof fabrics with a special film called THERMOSEAL, once the embroidery has been completed. 
Original text by Olga Dushenkova

Step 1 – put the “sandwich” you're going to embroider under the main fabric.  After an outline is stitched, you’ll need to trim the extra fabric (that is, everything beyond the outlined area). 

Step 2 – put the second piece of fabric, of a contrasting color, and stitch the second outline (snowflake-shaped).  Now, trim the extras (the fabric beyond the outlined area). 

Step 3 – embroider the design, take the hoop out and put the next piece of fabric under the wrong side of the embroidery.  Again, after an outline is stitched, you trim the extra fabric (from the wrong side) – that is, everything beyond the outlined area. 
Step 4 – embroider what’s left. 
Step 5 – attach an already prepared eyelet to the center, then fold the design in two and add the finishing stitch. 

Original text by Marina Belova 
I consider it to be a common knowledge that one should turn a replacement needle 0–5° to the right.  That’s what every embroidery machine manual says. 

A long time ago Vera Osinina asked me about a device that helps to position new needles whem you sew machine embroidery designs. I was quite a bit surprised then, so I only shrugged and said that such a contrivance was unknown to me, and that I didn’t know where to find one. 
But the cat always comes out of the bag, sooner or later. The answer came from a wonderful Melco Bravo website. They offer a cylindrical-shaped orientation magnet – you can buy it here. You need to attach its butt perpendicular to the long groove, to see at what angle and in what direction the needle is positioned.  
You've set the right angle if the magnet is turned approximately 1 minute on a clock face, or 6 degrees. Genius lies in simplicity, as they say. 
Of course, there is no need here to order a magnet from the U.S., at an astronomical price.  I guess a simple magnet instead of a brand one, will do for me
There was a long argument about the diameter: I insisted upon buying a thin cylinder, as my American colleagues use, and my husband stood for a thicker one as more visible. 5 mm cylinders were purchased eventually. We tried the magnets and saw that they worked: the positioning of the groove was no longer the problem. One only needs to get used to it so that it doesn't hamper the replacement. I checked all my needles only to find out that all of them were set higgledy-piggledy – one of them was even turned let; that was immediately fixed. Small wonder that my threads kept breaking. 


The magnet turned out to be a real helper to those whose eyesight and eye estimation leave something to be desired. 
 
Author: Seva Brother
Embroidering a decoration is not difficult. Our website offers numerous masterclasses and step-by-step guides into embroidery on knitwear, cotton, wool, and velvet, choosing the right kind of stabilizers and threads. This masterclass was done on the Brother machine.

Besides beautiful brightly colored photos, it offers some insights into making a ready-to-use item that could afterward serve as an appliqué. The machine was running in the embroidery mode.
Sewing in the hoop: a decorative element
There are no clear recommendations on the subject. Use any cotton fabric as your base. In this masterclass, I didn't use any stabilizers, but you can strengthen the fabric with a thin adhesive one if you are not sure of the result. This will add some density and will make turning the item inside out and forming fine sharp angles more difficult. You can use any kinds of embroidery threads (polyester or rayon).
Depending on the fabric and the design color scheme, use black or white bobbin thread.
Sewing in the hoop: a decorative element
Hoop the fabric with its right side up. Open the design on your machine, choose the color scheme and embroider. Owners of Brother embroidery machines that have this nifty Color Shuffling option, may use it to create a color palette according to one of the available charts. Others will have to rely on their artistic flair.


Sewing in the hoop: a decorative element
Choose a 02-001 frame from the ones your embroidery machine offers. Change its size to fit your design and your preferences. In any case, see that it is not smaller than your design and bigger than the hoop you intend to use.

Cut a square out of a different fabric. The square should be larger than your frame. Place it on top of the design, with its wrong side up, as shown in the picture. Using an adhesive tape, stick it to the hooped area, to prevent it from slipping away during the embroidery.
Embroider the frame.

Unhoop. Trim the extra material, as shown in the picture. Please mark the way in which the fabric at the corners was trimmed! Cut small slits in the center on the side that doesn’t have the embroidery. Turn your item the right side out.


Please note that the size of the resulting embroidery will be defined by the size of the chosen frame!

Now let’s think where you can use this decorative element.
Original text by Marina Belova
I wonder if anyone will ever argue that blending thread colors in machine embroidery is slightly different from blending printing colors or paints? But then again, even in painting, there have long been attempts to prove I.Newton’s classic theory of colors wrong. For those who are interested, there’s a book by Michael Wilcox called Blue and Yellow Don’t Make Green – go and read it.
But let’s get back to the topic. All guides, books, and other information materials on color formation in machine embroidery are nevertheless based on Newton’s classic color wheel. For the sheer reason that you have nothing except them and your own experience to rely upon. Besides, choosing a right color with the help of the color wheel is much better than without it. Especially for the neophytes.
That’s why I will take the liberty of touching on the subject of color in a machine embroidery design.
Colors can be divided into 2 groups:
Chromatic – the colors of the spectrum. Achromatic – white, black and all shades of gray. Let’s look at the canonical 12-part color wheel made of chromatic colors:

It’s basis is formed by just 3 colors: yellow, red and blue (marked “I” in the photo). These are called primary colors, as they cannot be obtained by mixing other colors together.
Secondary colors result from the intemingling of the two primary colors. In the photo, they are marked “II”. These are orange, green and purple.
Tertiary colors are made by mixing two of the secondary colors (marked “III” in the photo). These are yellow-orange, red-orange, red-purple, blue-purple, blue-green and yellow-green.
Also, there are such concepts as:
Color hue – a property of color that defines its tone; we usually have separate names for them (lilac, magenta, etc.).
Lightness – the shade of lightness/darkness. To get a shade you add some white or black to your source color. A mixture of color with white is called tint, and a mixture of color with black is shade.
Saturation is the degree of intensity and purity of the color.
Color temperature is connected to the idea of colors being “cool” or “warm”. On the basis of this idea, all colors are divided into warm, cool and neutral.
There are several ways of creating harmonious color schemes, containing 2–4 colors, with the help of the wheel. For example:
Mono – includes one color in different values. In this case, we only add shades and tints.

Complementary – mixing of 2 (contrasting) colors on the opposite sides of the diagonal.

Triadic – mixing of 3 colors that are located at the corners of the equilateral triangle:

Mixing 3 analogous colors: Analogous colors are those that follow each other on the color wheel.

Split-complementary: mixing 3 colors – two analogous and one contrasting.

Mixing 4 colors: 3 analogous and 1 contrasting.

Tetrad: mixing 4 colors arranged into two complementary pairs.

Besides the ones above, there are other color harmonies that can be found in books and on the Web. The only thing left is to do is to practice, and don’t forget that the threads cannot blend together like paints. Also, the stitch types, stitch angles, textures selected will make their not so small impact on the end result.
I’m curious if any software has algorithms helping to choose threads automatically, on the basis of the existing thread color palette, but using the methods described above?
Monograms are stylized initials of somebody’s name, surname or patronym. A monogram is a personal logo of sorts. Known since the 4th century BCE, monograms have a very long history.

Embroidering a monogram is an excellent and popular way of creating a personalized gift. You can embroider on anything, including bath and kitchen towels, clothes, bed linen, handkerchiefs, pillows, lambrequins, bags and toys. These are just a few of the things that can be given as gifts.
A thought struck me just now that there are common traditions one must stick to in order to avoid making a blunder. It turned out, there exists a monogram creation and usage etiquette. According to it, you need to know for whom the monogram is intended and to separate a person from a couple, a man from a woman, a kid from the betrothed. This knowledge will define the typography. In every case, there are nuances. Everybody knows, for instance, that monograms are always read from left to right and from top to bottom.
A traditional way of creating monograms
Choosing a font
According to the tradition, all the letters in a monogram are capital and should be of the same type.
Square letters are for men, slant handwritten letters – for women and married couples, and calligraphic script is for women only. You can read more on the topic in my article about Fonts. Types of monograms.
The outer look
In a woman’s monogram the first initial is a name, a small letter. The second is a surname. This is the biggest letter in the monogram. And the third initial is a patronym, again, a small letter. In a man’s monogram, the order is the same, but all the letters are equal in size. It is possible to omit the patronym in a monogram. If that’s the case, you first write the name, then the surname, the initials being equal in size.
As a rule, a child’s monogram consists of only 1 letter.

In a monogram for a married couple, the first, small, initial belongs to the wife. A big initial denoting a surname follows, then comes the husband’s initial – again, small. The levels at which the letters are placed, may be different.

If a couple has double surname, these 2 initials are made big and positioned in the center. For household use, you might employ just one letter in a monogram – a surname.
Naturally, there exist simple monograms, consisting of separate letters, and also of linked ones.

Monograms usage
If a monogram contains several letters, it is intended for official use. One letter is for unofficial cases.
A modern way of creating monograms
It’s XXI century now, many things have been changed and simplified, so now we have an opportunity of using any style we like, even the most bizarre. Yes, the way you like, not the conventional way.

Choosing a font
There is a great variety of fonts that can be used in monograms. Traditional types with serifs are still popular, but there are also the ones without; fancy fonts with excessive decoration in the form of flowers, leaves, berries in a so called “French style” are very common. And of course, one cannot forget to mention the convoluted calligraphic script, which is widely used to this very day. Men’s and women’s preferences in the character style have changed as well. Nowadays women prefer simple elegant fonts. One multicharacter monogram may contain fonts of different styles, in order to reflect the personality of its owner.

The outer look
Many women’s monograms of today consist of just 1 letter (denoting either a name or a surname), and men’s still have 3.

If all 3 of the letters are of equal size, their sequence is changed: first comes the name, then the patronym, and the surname is the last.
Personal monograms of 2 letters (name and surname initials) are possible. Both 2-letter (two names) and 4-letter (two names, two surnames) monograms can be used for the betrothed. The sequence of letters is not fundamental as it used to be. But those in the know advise following the tradition when creating monograms for bed linen, decorations and silverware. Monograms are often fit into a geometrical figure: a circle, an oval, a diamond, etc.


Garlands of flowers, crests, crowns and wreaths of various kinds may be used as well.

Apart from the initials, an entire name is often embroidered today – one should keep this in mind.
The collection of ancient monograms, now in public domain, can be found on the Web and used as a starting point for your own creative effort. The only thing you’ll need to do is to follow the rules above.
There is a huge variety of the already existing monogram templates. They can be incorporated into the average embroidery software.
Some editors are even tooled for the creation of monograms only. Here you can find free monograms from the (Stitch Era Universal). You can see similar ones in any other editor, only chances are that there will be more of them there than coming from a free source.

Well, they’re not the sharpest tools in the shed, but these monograms are better than nothing if you need to create a present.
Read how the embroidery designs, monograms included, are usually positioned on an item.
So, if you cannot draw or don’t like what you see in the free circulation, you can turn to a professional that creates various monograms to order. And if you need something simple to embroider it on an item, you can use a very handy application that has a built-in set of various fonts, vignettes, monograms, emblems and crowns.
A summer bag is a necessity for every girl. You can make a stylish summer bag out of a plain linen fabric. A simple design and a fair-colored fabric will make it fit for every occasion

Such an accessory will look equally good in the office and on the beach. It harmonizes with a business suit and a simple tunic.
Originally, the bag and the following masterclass were intended to showcase a  flower machine embroidery design from our collection. A fake flap immediately beneath the zipper and a pocket with a metal clasp will be used as a decoration.
These last two elements are made of a machine embroidered fabric. Silk threads will give a beautiful glitter under the sun and in the artificial light of the lanterns.
Materials:
 • 0.35 m of a thick cotton fabric (1.5 m wide);
 • 0.15 m of a printed fabric;
 • 0.35 m of a lining fabric (1.5 m wide);
 • 0.5 m of an interfacing fabric (1.5 m wide);
 • 1 metal clasp;
 • 1 handle with carabiner-style clasps;
 • 1 zipper with big size teeth (no less than 30 cm);
 • 0.25 m of a corded silk ribbon 1 cm wide;
 • white threads.
Instructions
First, you need to cut out the pieces of your future bag from the main fabric: front and back – 35 x 30 cm each; bottom part – 8 x 27 cm; pocket – 15 x 12 cm. From the printed fabric, cut out the rounded flap (27 x 12 cm) and a strip (19 x 5 cm) that will be used as a pocket decoration. Photo 3.

Glue all the elements to the interfacing. This will make the bag thicker thus enabling it to maintain its shape. 
Put a pattern piece on the sticky side of the interfacing fabric and iron it. Photo 4.

Repeat with the rest of the pieces. You can leave the pocket and the decorative ribbon as they are. Photo 5.

But the flap must be strengthened. Cut the interfacing close to the edges. Photo 6.

On your sewing machine, sew the bottom and the sides of the bag together. Photo 7.

You should get a template which will become the front side of your bag: Photo 8.

Sew up the side seams. Photo 9.

Pin and sew the side seam on the bottom of your bag. Photo 10.

Now, let's make a pocket. Fold the upper edge twice with the right side inside and stitch it. Fold the other sides and iron them. Turn in the edges of the decorative ribbon and stitch them. Run the ribbon through the metal clasp. Put it onto the pocket. Pin it. Stitch it to the bag. Photo 11.

Pin the pocket onto the front side. Turn in the edges of the ribbon. Stitch it to the bag. Photo 12.

Out of the underlay fabric cut out the parts of your future bag (except the pocket and the decorative ribbon). Photo 13.

The underside is sewn in the same way as the front. Photo 14.

Put the flap parts together with their front sides facing each other. Stitch them together, leaving a 7 cm clearance gap. Make incisions in the rounded edges. Cut the sharp corners close to the stitching. Turn it the right side out. Iron the clearance gap. Photo 15.

Put the flap onto the front side of the bag. The distance from the upper edge should be 2.5 cm. Stitch it to the bag. Photo 16.

Now, you'll make bag handle hinges out of the corded silk ribbon. Sew them onto the bag near the side seams. To make them more durable, fold the ribbon in two. Photo 17.

Now, sew in the lining and zipper. Photo 18.

Attach the ready handle with carabiner-style clasps to the hinges. Photo 19.


There are two types of stabilizers: toppings and backings.
A top stabilizer (topping) is used to prevent stitches from sinking into loosely spun and textured fabrics. Use a top stabilizer when embroidering on knitwear, velvet or velour to help stitches to stay in place. A top stabilizer won't prevent fabric from puckering. For this purpose, use backing.  For laces, the backing is used as a base fabric.
Machine embroidery stabilizers (interfacing, etc.) in our shop.
Backing
Backings are special, primarily non-woven materials, that provide support and stabilize the fabric during the embroidery, prevent creasing, distortion, and stretch. They are put under the fabric being embroidered.
There are several types of backings: tearaway, adhesive, cutaway, water-soluble, heat-away.
Tearaway stabilizers
Tearaway stabilizers usually consist of paper of varying density (thickness).
Tearaway stabilizers are good for most natural fabrics and give only a temporary support. This kind of stabilizer is easily removed and can be successfully used in cases where the wrong side will be seen (towels, plaids, scarfs and so on). It is also widely used with non-transparent fabrics of fair colors, with thick and densely woven fabrics made of natural fibers (denim, for example). Not recommended for any kinds of knits.
Adhesive stabilizers
These are glued to the wrong side of the item, thus giving it stability.
There are several types of adhesives:
An ordinary adhesive stabilizer with glue on one side. The item is attached to it with an iron.
Adhesive paper with a sticky side covered with a protective layer. This paper is necessary when embroidering tricky fabrics: velvet, cashmere, leather, which are better not to be hooped. And also for the items that are hard to hoop: collars, cuffs, small details.
An adhesive paper is placed in the hoop with a sticky side facing up, then the protective layer the size of the embroidery area is removed, and the item is placed on top. Having embroidered the item, tear the paper away. Example: FILMOPLAST®.
Cutaway stabilizers
Cutaway stabilizers (backings) are used for stabilizing highly stretchable fabrics and provide constant support during the embroidery. One needs them to embroider a machine embroidery design with a lot of stitches, in order to avoid fabric distortion, preventing the appearance of bulges or concavities (the effect stays even after several washes).
A cutaway stabilizer is always thicker than a tearaway. It consists of a non-woven fabric made of long fibers on the basis of polyester or rayon. The way the fibers are arranged in a stabilizer defines its purpose.
If the fibers are mainly single-oriented, it stretches and tears in this one direction. Therefore, to stabilize the fabric properly you need to use 2 layers of backing, positioning them perpendicularly. There are backings of varying density.
Bonding short fibers (polyester, rayon, cellulose) together by solvent treatment, you'll get a non-woven fabric of high quality, which is soft like a tearaway stabilizer, has a smooth surface and does not stretch in any direction. This stabilizer can be of varying density and just one layer of it is sufficient. It is considered the best embroidery stabilizer because it does not add extra volume to the embroidery and does not show through the fabric.
Among the cutaway stabilizers, one should note spunbond – a thin, very soft material that resembles a waffle. USA Poly Mesh or No Show Mesh stabilizers. This kind of backing is good because it does not stretch at all, providing support all the time, and is not visible through the fabric. It comes in various colors and densities. It is used for knits.
Solvent stabilizers
Solvent stabilizers include a water-soluble fabric-like stabilizer and a water-soluble film of varying density. They are used for stabilizing the embroidery when it is necessary to remove the backing without traces. For example, organza, transparent fabrics, FSL, and cutwork.
Water-soluble stabilizers come in two varieties: textile interfacing materials and films
100% polyvinyl alcohol (PVA) stabilizers Both are dissolved in water. Time of dissolution depends on the temperature of water. Approximate valued by Gunold:
20 °C about 3 min 25 °C about 2 min 30 °C about 1 min 40 °C about 15 sec In real life, water-solubles are not so easily removed, and it takes more than one round to get rid of it completely.
The intended purpose of a water-soluble film depends on its thickness:
Thin (20 microns) Used as toppings for lightweight fabrics.
Medium (35 microns) are used for textured fabrics (velour with and without pile, velvet, fur and loop fabrics). When embroidering small details and letters on textured fabrics the film should be placed on top for better results.
Dense (80 microns) are used as a base fabric for so-called 3D embroidery, FSL, chevrons, cutwork, and as a stabilizer for the fabrics where the wrong side should look good, also for transparent fabrics.
Heat-away stabilizers
They are used when it is necessary to stabilize the fabric, which shouldn't get wet and you need to remove the backing leftovers. They can be successfully used for creating FSL, as well as water-soluble film. They are removed with a very hot iron (no less than 120°) through the paper. Under no circumstances should steam be used with fusible stabilizers.
Upper stabilizers (toppings)
These are necessary to prevent the stitches from sinking into the pile, loops, fur and other materials of that kind, also with loosely-knitted fabrics. Gelatin-based toppings are widely known because they can be easily solved in water. This is what is called a water-soluble film.
There are two types of water-soluble film: thin and thick (dense). Thin film is used practically with everything, thick one – only with high piles.
Next kind of stabilizers is a fusible stabilizer. They are used in cases when the fabric cannot be washed, and therefore, the use of water-soluble film is not possible.
 

Recently Browsing 0

  • No registered users viewing this page.